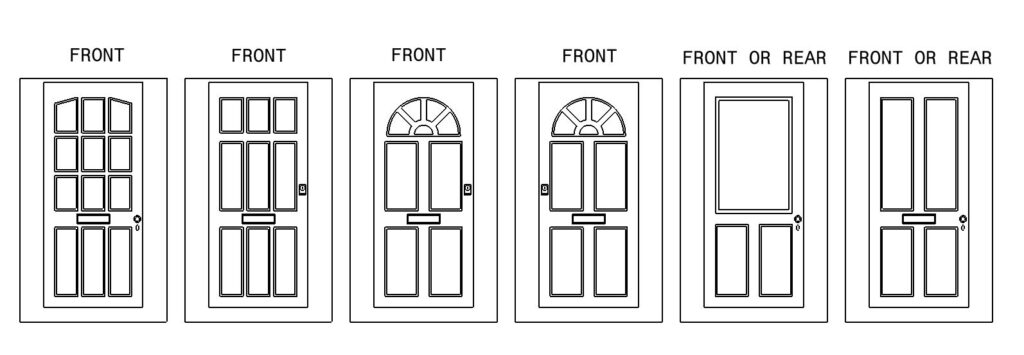
Before you start you need to think about the options in this kit. There are several front door designs that we have included in the kit and also it is possible to build the house without the loft (Dormer) window in the roof of the building. More on these options as we go along.
There are some parts that look similar to each other, but we will show you how to identify them as we progress through the build. We recommend that you read through the instructions first before starting. When assembling each piece it is always best to do a dry assembly first of each part before applying glue. The parts are very accurate, but now and again may need slight sanding on the lugs to get them to fit easily together. Use super glue for assembly and only apply a dot here and there along the mating faces. Push the parts together and hold them in place for about 30 seconds and the glue will take hold. Have a small modeling knife handy and a bit of tissue as any excess glue can often be scraped away easily during assembly.
Pay attention to the squareness of the build. This is particularly important early on when we build the inner walls. If these are square and the corners pressed together and taped neatly whilst the glue dries, this will benefit us later on when we add on the outer walls.
It is possible to paint this model when complete, but we recommend you do this when the basic inner construction is done and then as you go along.
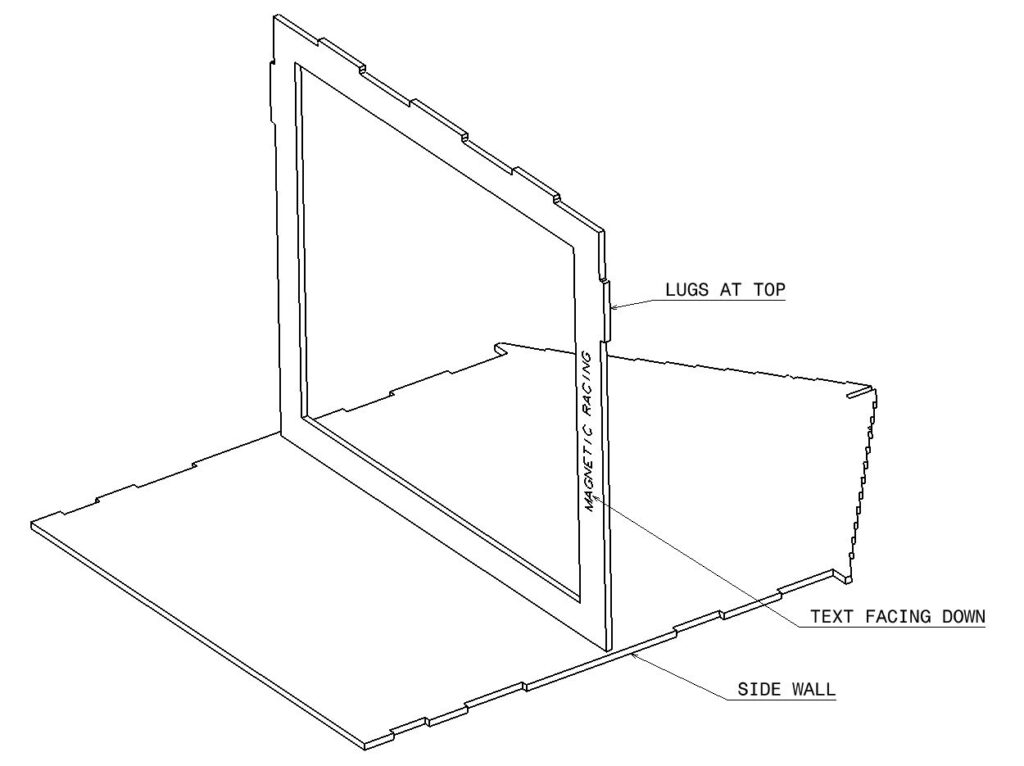
Now to begin we will construct the inner walls first. We need to glue these at right angles and ensure the corners are pressed together. Have another large square piece from the kit handy of an engineers square as we can push this against the two parts to ensure it is glued upright. Take out one inner side wall. There are two in the kit and we can use either. Also locate the part with the “Magnetic Racing” text on it. Trial fit these parts together to ensure the three lugs locate. Note the single lugs on each vertical edge are toward the top and the text faces down to the bottom of the model as shown. When happy apply a few drops of super glue along the mating faces. Press the parts together and hold them square. Hold the other part you have to hand against the back so the assembly glues perpendicular. After about 30 seconds the glue will hold and the connection is made.
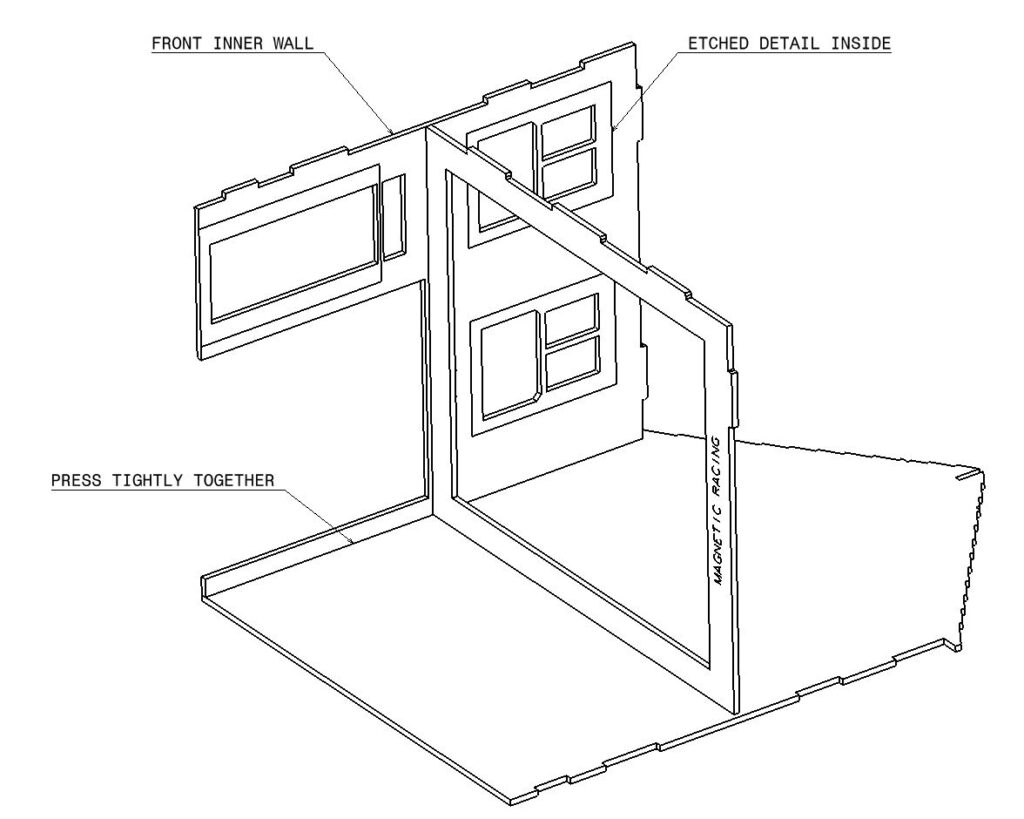
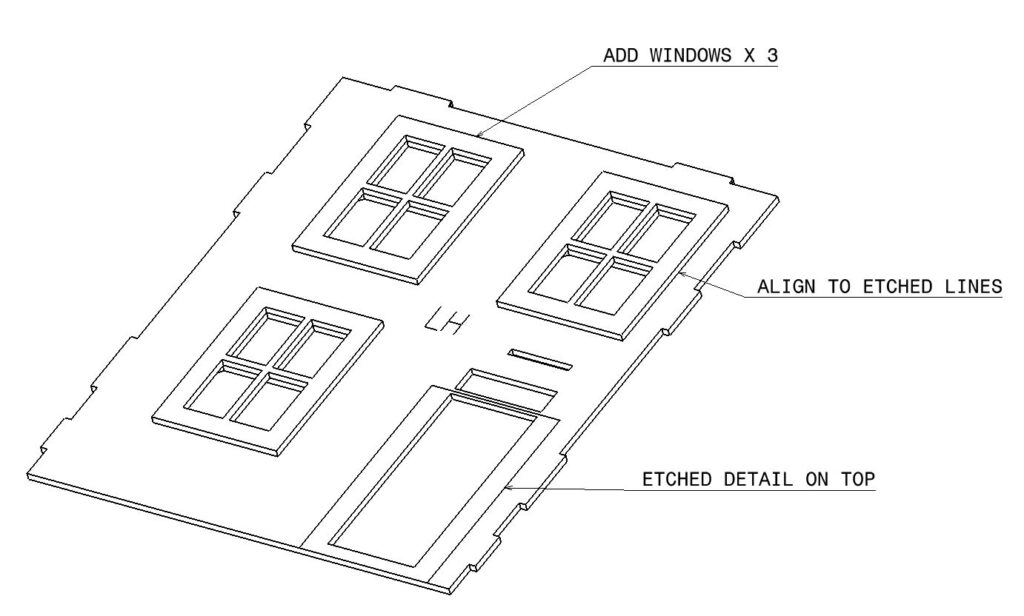
If you feel you need more working time feel free to switch to white wood glue, however it is possible to complete all the build using super glue. Now add on the front inner wall. This has etched line detail around the door and windows and this needs to face inwards. Double check that this part has the letters “RH” on it as we are building a right hand model. Trial fit the part without glue first to identify where you need to apply glue. Have some masking tape handy also. Apply glue, press the part together and use the tape to hold the corner tightly together. This is particularly important at the lower end where it is flexible. Allow this to completely dry before continuing.
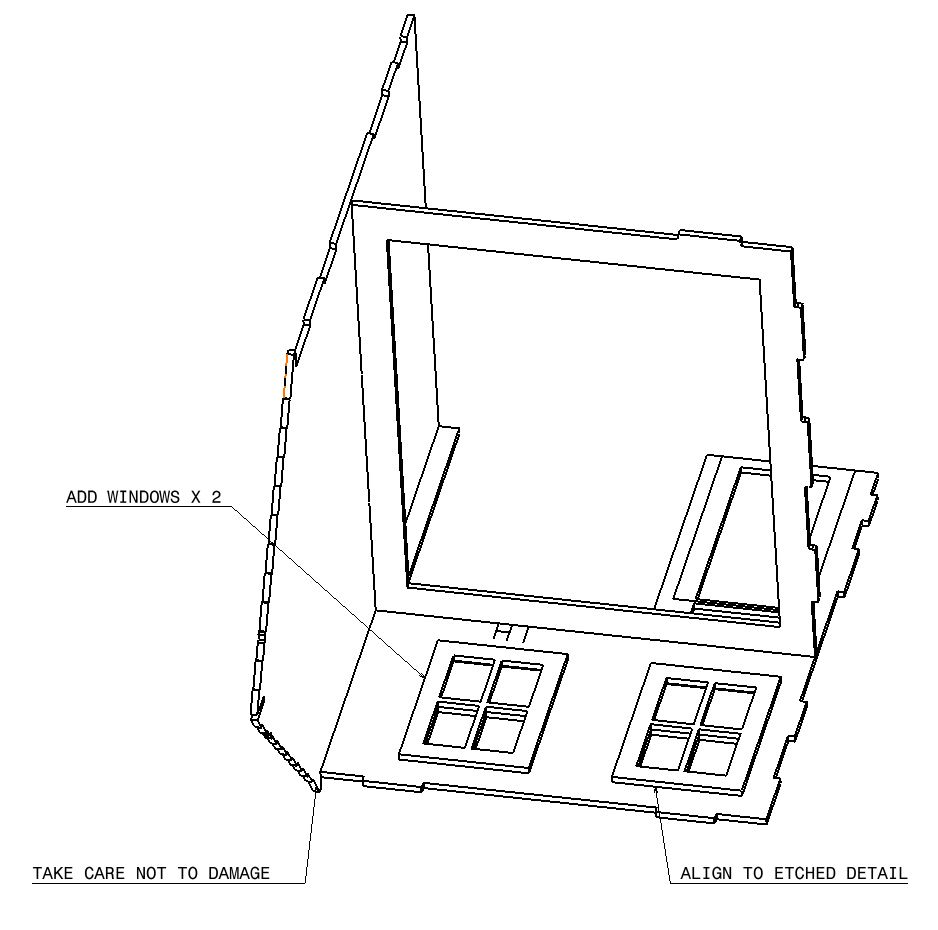
Turn the model and orient it as shown below. We now need to add on the upper windows. There are five in the kit and these have wide frames. Glue two to the inside of the model using the etched lines as a guide. Glue is best applied on the main model. Just 4 drops in the corners on the etched lines. Press the part home and double check underneath that glue hasn’t been pressed to the outside. If that is so, a quick scrape with a modeling knife and tissue should have it cleaned up. You can always add more glue later around the edges when the part is in place. Note that there is a small extension on the model that is vulnerable if you press down too hard.
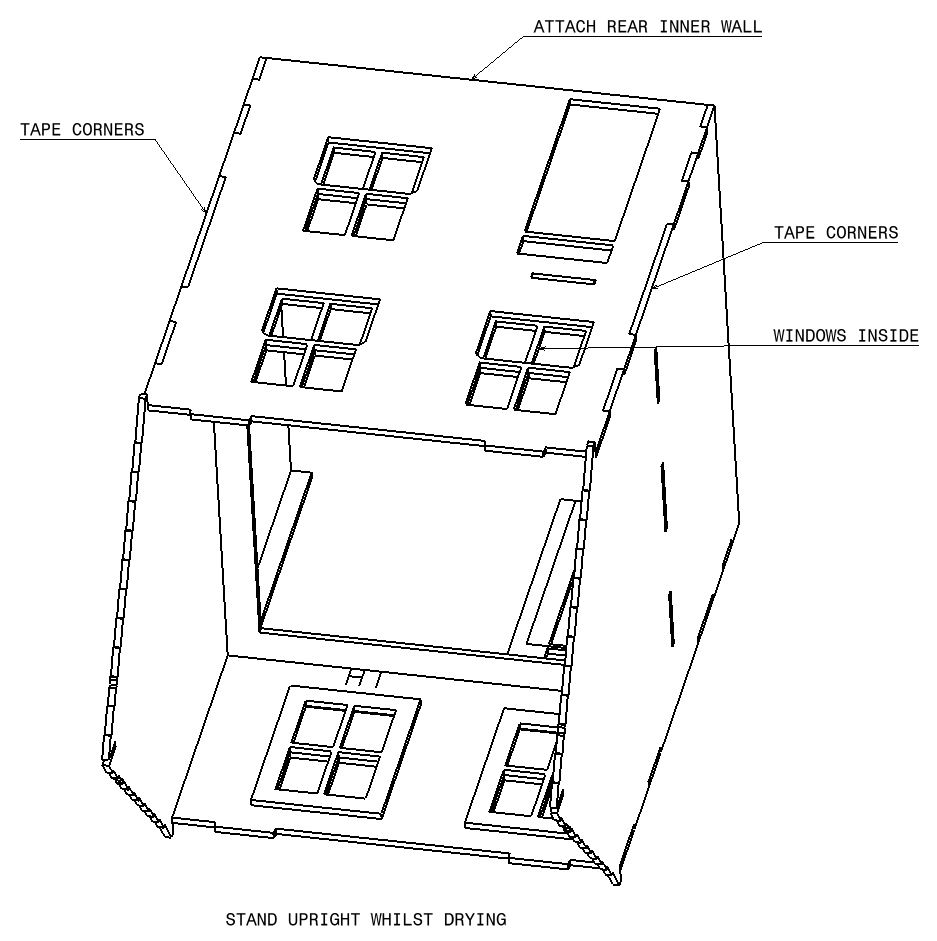
Add the other inner side wall. This is an identical part to the other end. Trial fit, then apply glue and tape to hold it in place. Before the glue becomes hard and with the corner taped together stand the model up on a flat surface. This way the build surface will straighten any slight twist you may have introduced. Allow the model to dry standing upright before adding the final inner wall.

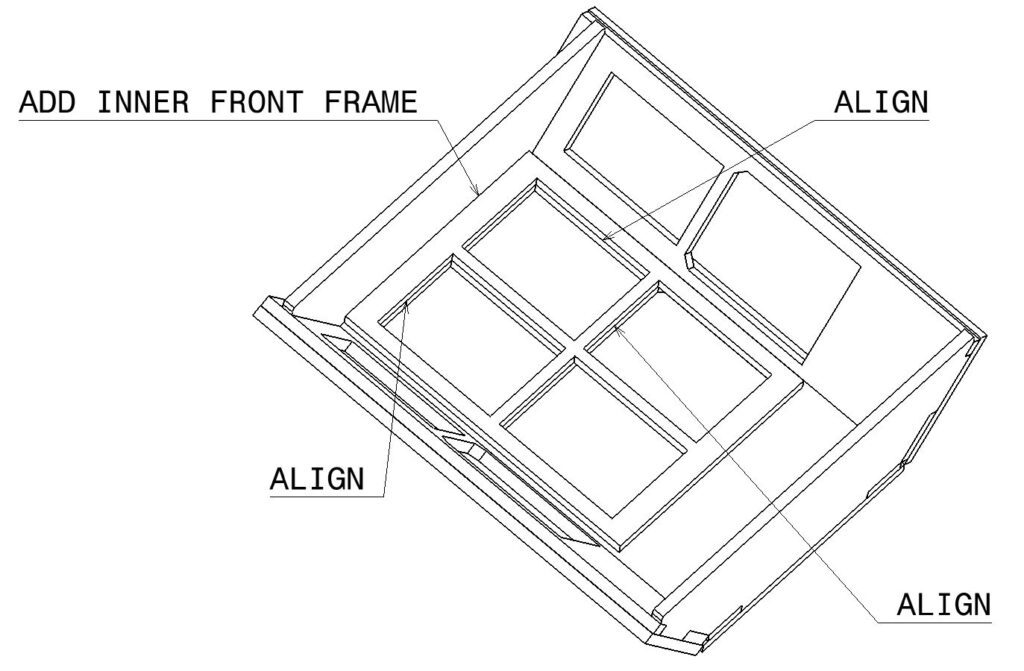
The last inner wall (check it is labeled RH) needs to have the remaining three frames added to the inside. Use the etched detail to align them as before.
Attach this part to the main model with the window frames to the inside as shown. Once again trial fit it without glue then apply glue and press it home. tape the corners tightly together then stand the model upright whilst the glue fully dries. We can then remove all the tape as the model is now rigid.
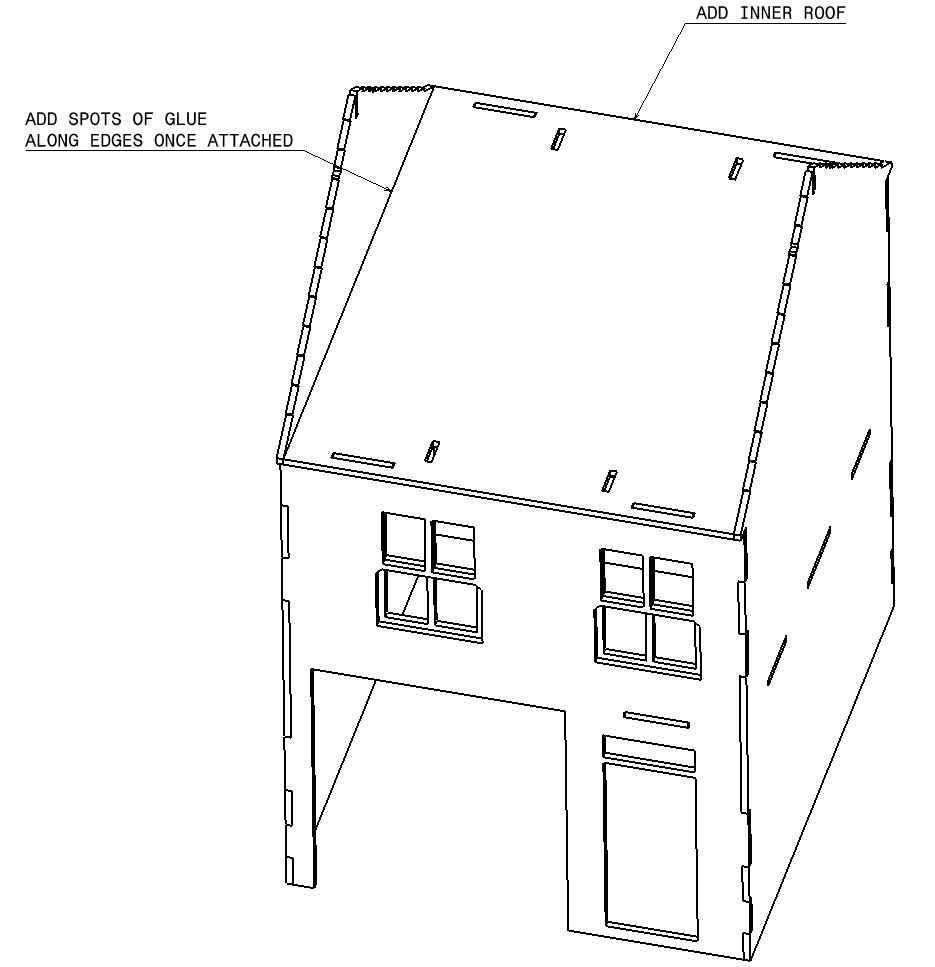
We now add on the inner roof. Apply glue to the top of the front and rear wall only. Glue the part in place. Once this is done, you can apply spots of glue along the inside of the end walls. Any excess glue here isn’t a problem as it is not visible on the finished model.
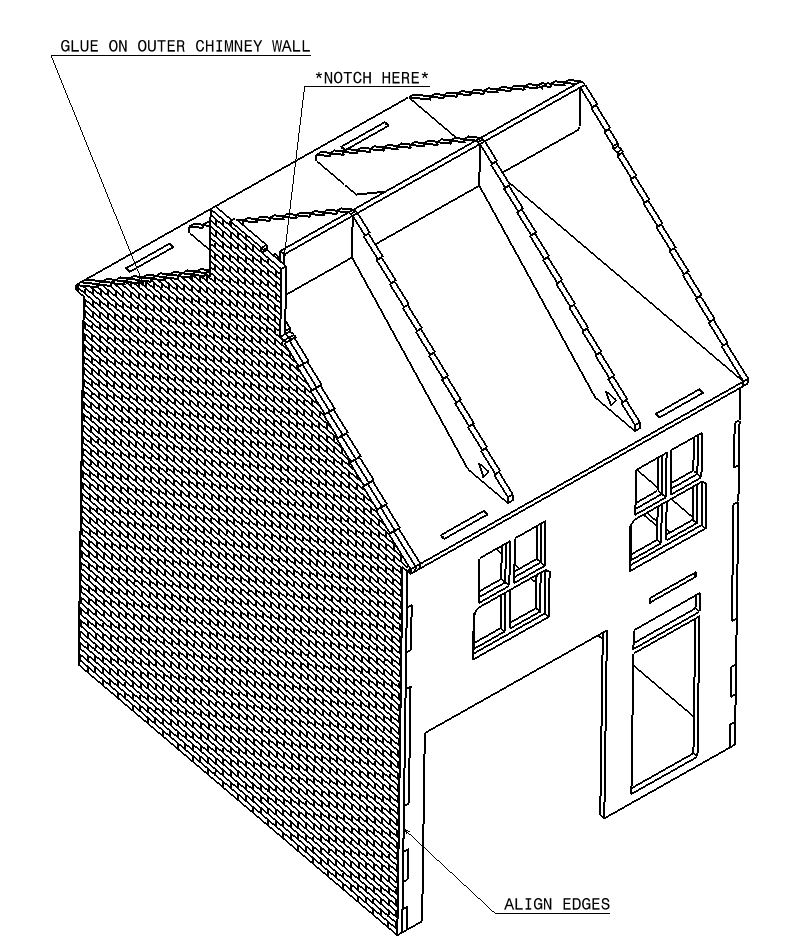
Now glue in the roof beam. IMPORTANT. Note there is an extra notch in this part and this needs to be glued at the end shown. It is the end that is above the large opening at the front of the building. If you don’t do this the chimney will be at the wrong end of the building. You could complete the model, but the fireplace would be behind the front door! This is logically wrong for most terraced houses. Apply glue then attach the beam to the model. Press the top of each end wall lightly against the part so it glues tightly together. This ensures the end walls are flat and square.

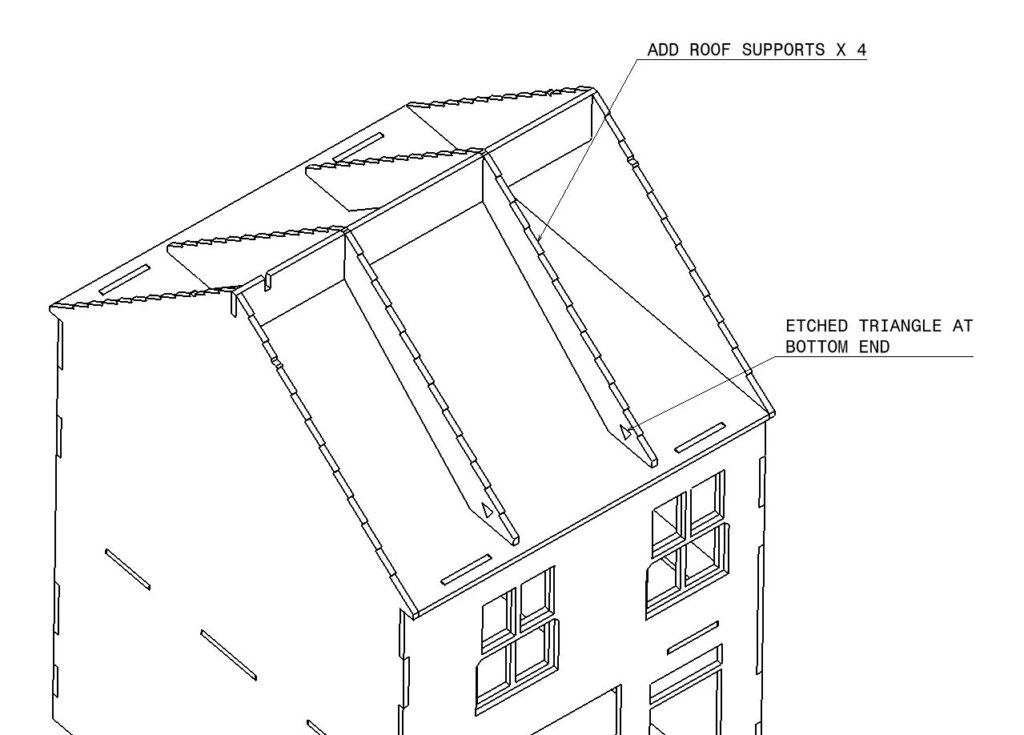
We now add on 4 identical roof supports. These have a triangle etched on them and this goes to the bottom end. Glue these in place and make sure they are pushed down to the bottom of the slot in the top beam.
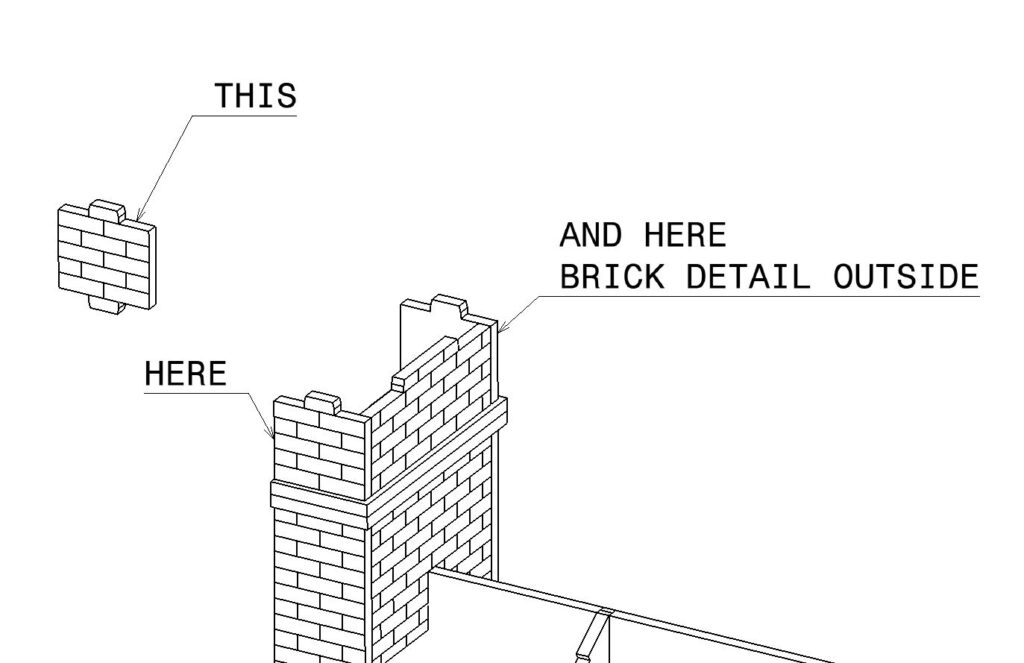
The outside end wall is next. This is the one with the chimney and it must be glued to the end where the roof beam notch is. Brick detail faces outward. Gluing is best achieved with the model flat on the other end wall. Apply glue and press home. Align all the way around, checking the side verticals and also the serrations for the tiles at the top of the model. Once more switch to wood glue if you need more working time. Bulldog clips or clothes pegs are also ideal here for clamping the part to the inner wall.
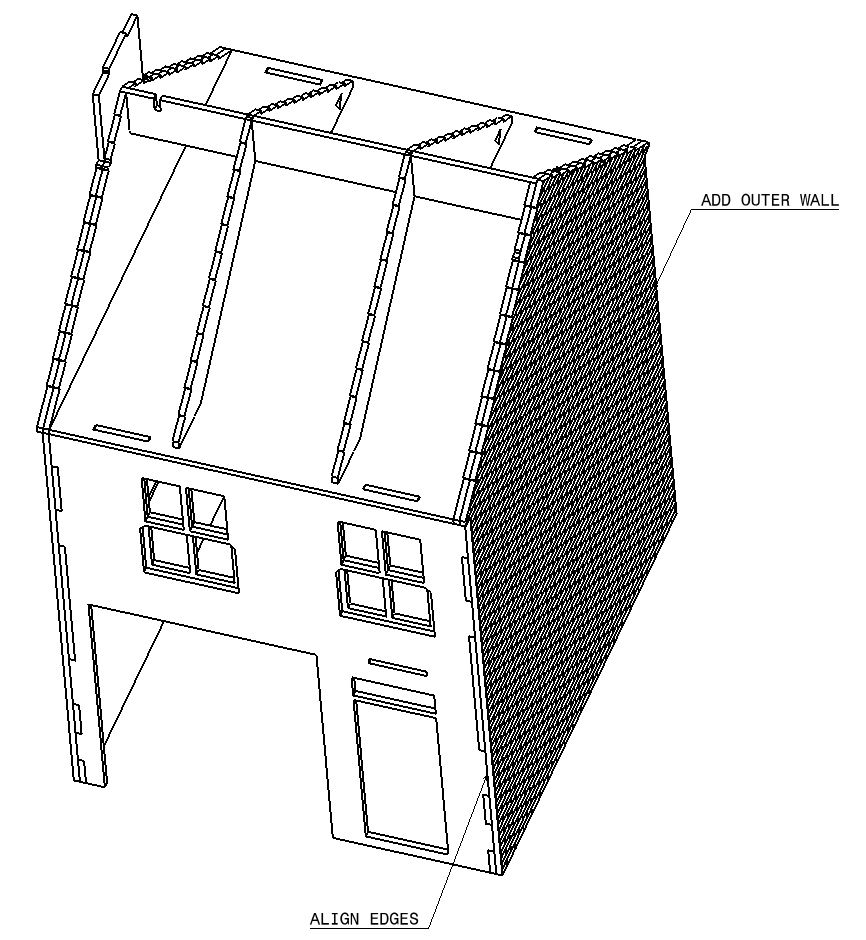
Add on the other outer wall. Once more lie the model flat and apply glue. Align all the edges.
Now glue on the front outer wall. This is labeled “RH”. Glue is best applied on the inside of the outer wall as this ensures you aren’t applying glue where it is not needed. Also don’t apply glue too close to the windows or door as it can be squeezed out when you press the part home. Once again take care of the roof overhangs, don’t place heavy weights on the model whilst drying otherwise these can be damaged.

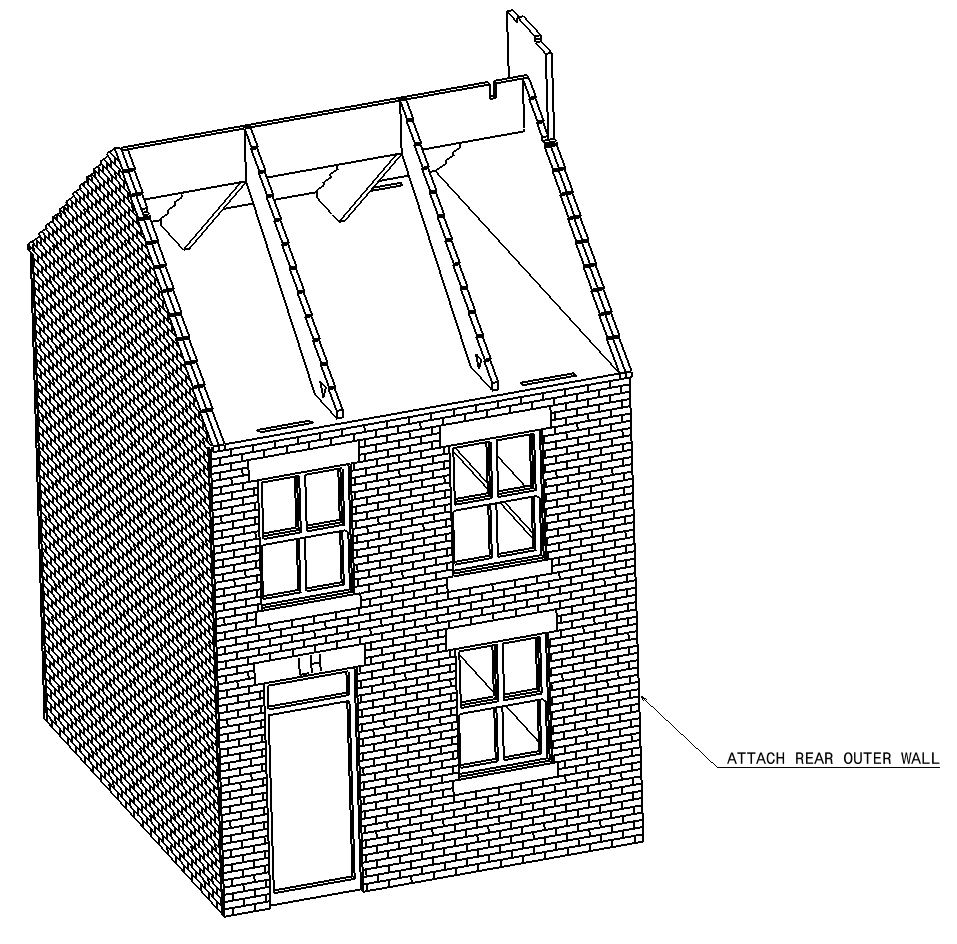
In a similar manner attach the rear outer wall..
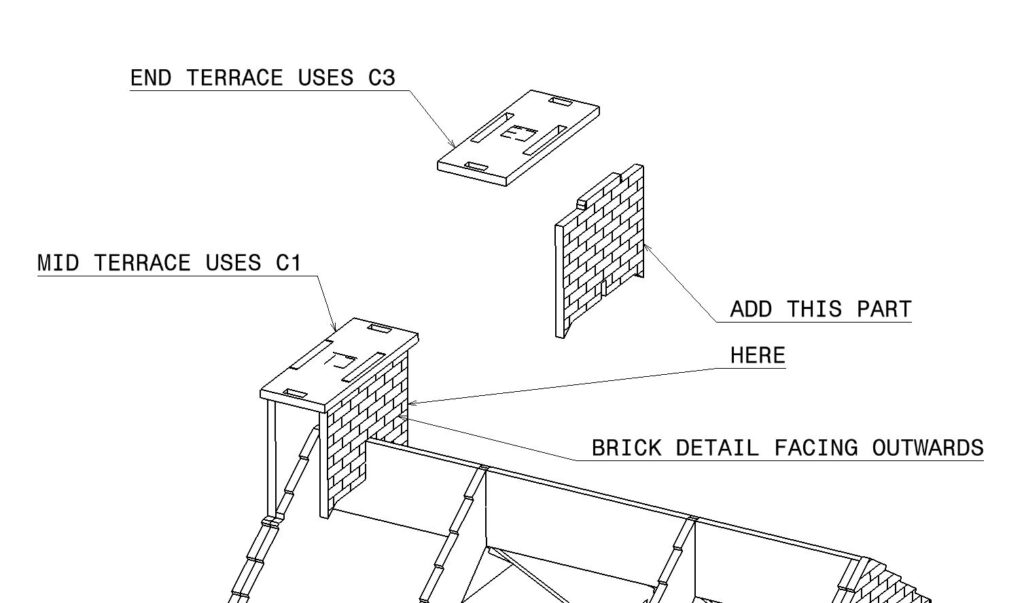
We need to build up the chimney next and we have options here. If you want the model to be an end terrace, get out parts C3, C3 and C4. A mid terrace where the chimney is to be against another needs C1, C1 and C2. If you are unsure, go with C3,C3 and C4 as you can always sand the end protrusion flush later.
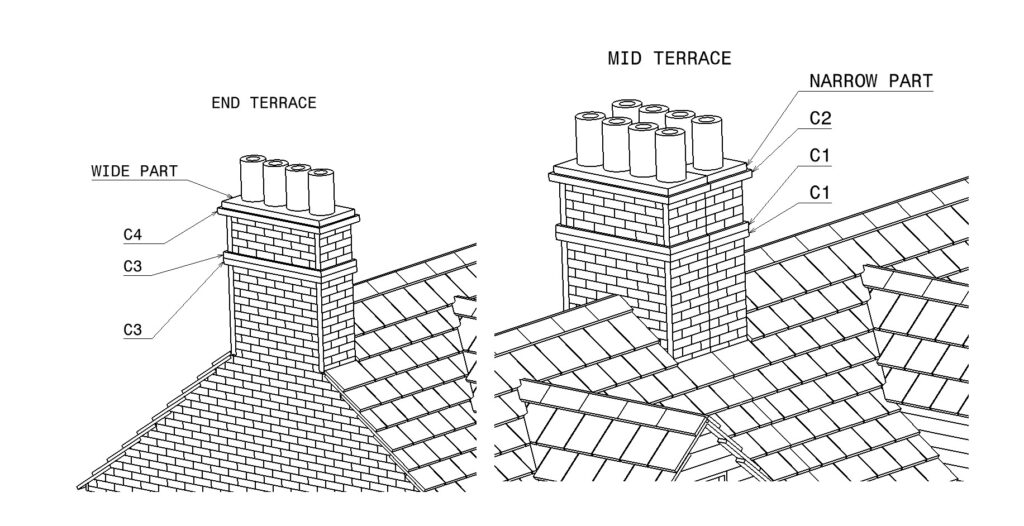
Identify the two parts as shown below. Apply glue and attach them together. Doing this ensures the chimney is built squarely. Brick detail faces outwards.
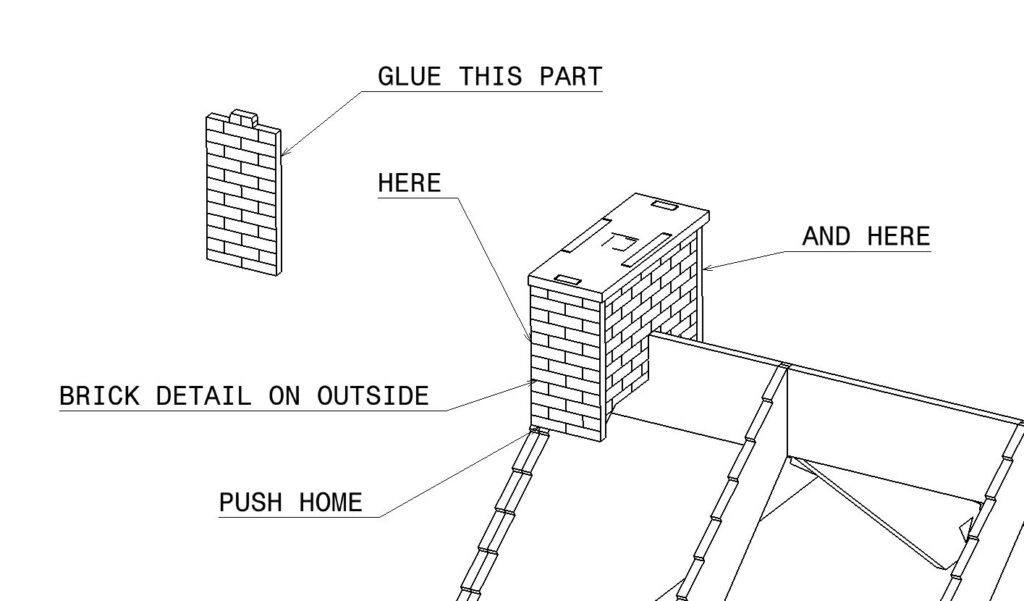
There are two identical parts to add at the front and rear of the chimney. These clip up in to the slots and are located on a notch on the end wall. Trial fit the part first to check it goes in easily. If you are struggling, sand a small chamfer on the lug and the parts will slide in more easily.
Now glue on another chimney dressing. This is identical to the one you have already glued on, this will be either C1 or C3 depending on which option you have chosen.
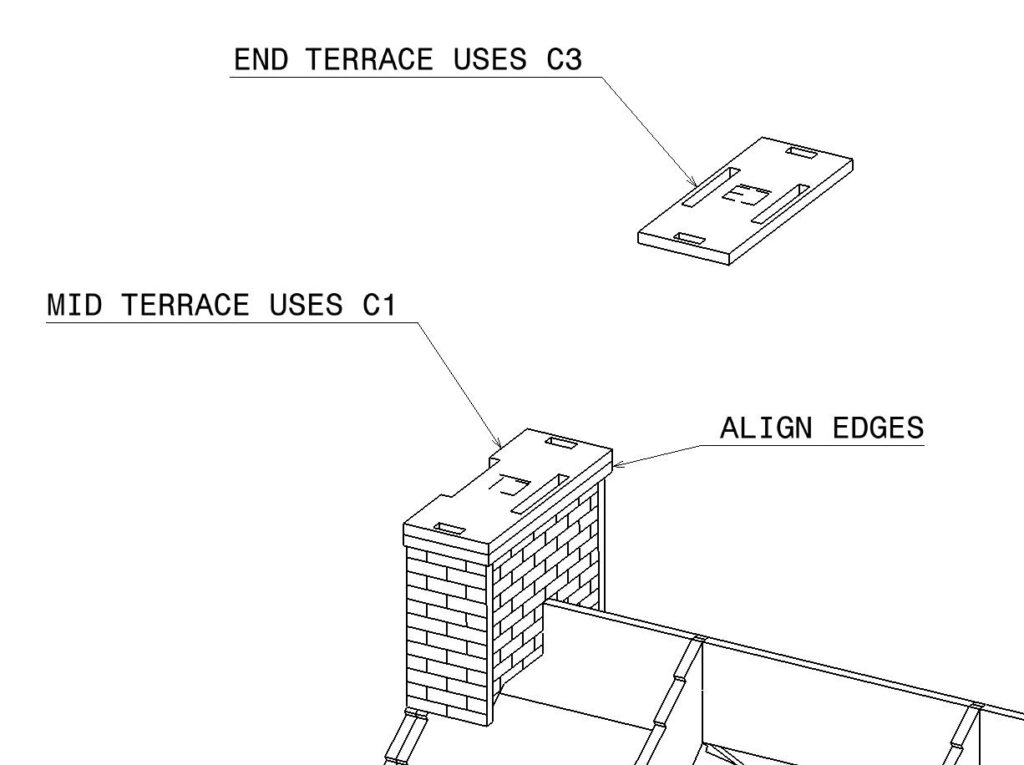
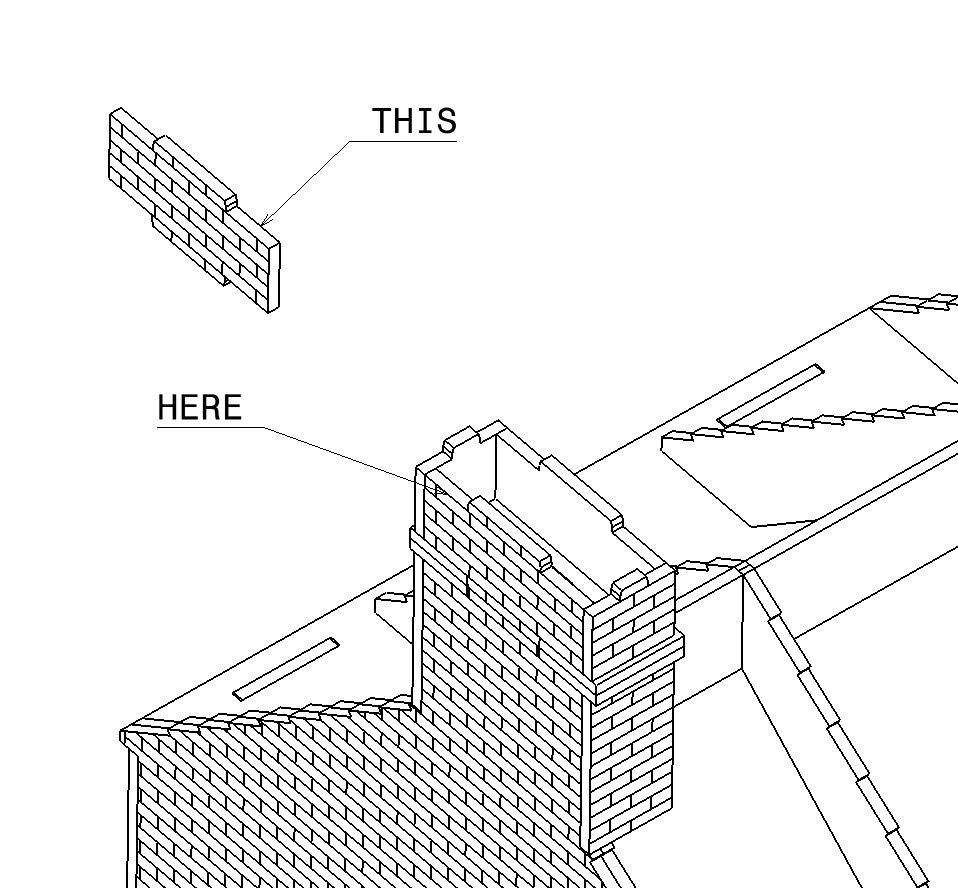
Continue to build up the chimney by adding the upper brick section. There are two identical parts in the kit, so use either. Have another square part in the kit and use this behind the part so you can glue it perpendicular. Ensure the brick detail faces outside.
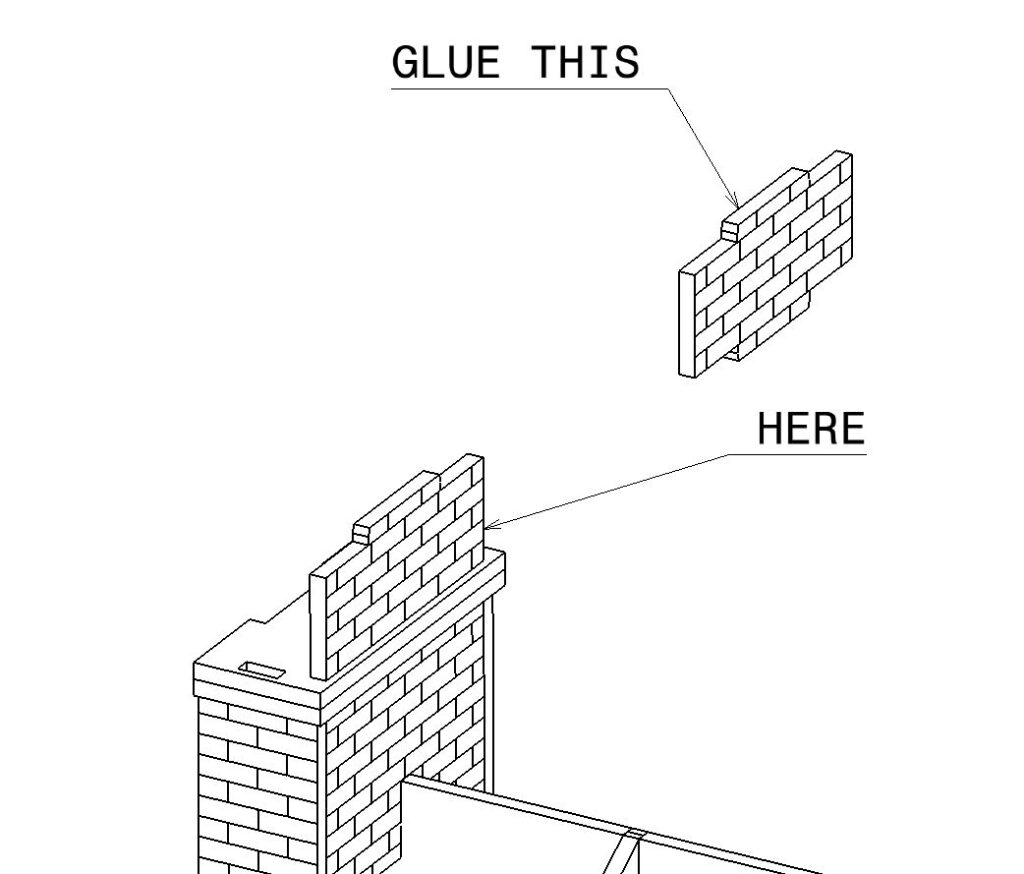
Add the two front and rear pieces as shown. Brick detail faces outwards.
Add on the end piece. This is identical to the piece you added earlier at the other side.
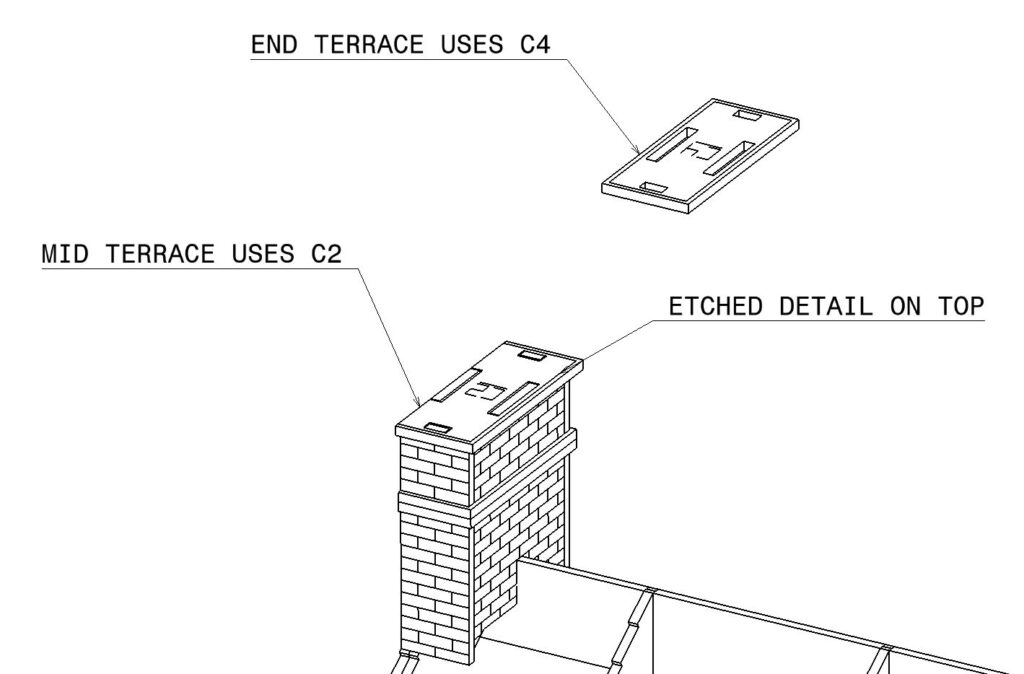
Now add the top trim piece. This is slightly larger than the lower decoration. Note there is etched lines on this part and this faces upwards. Use either part C2 or C4 depending on option.
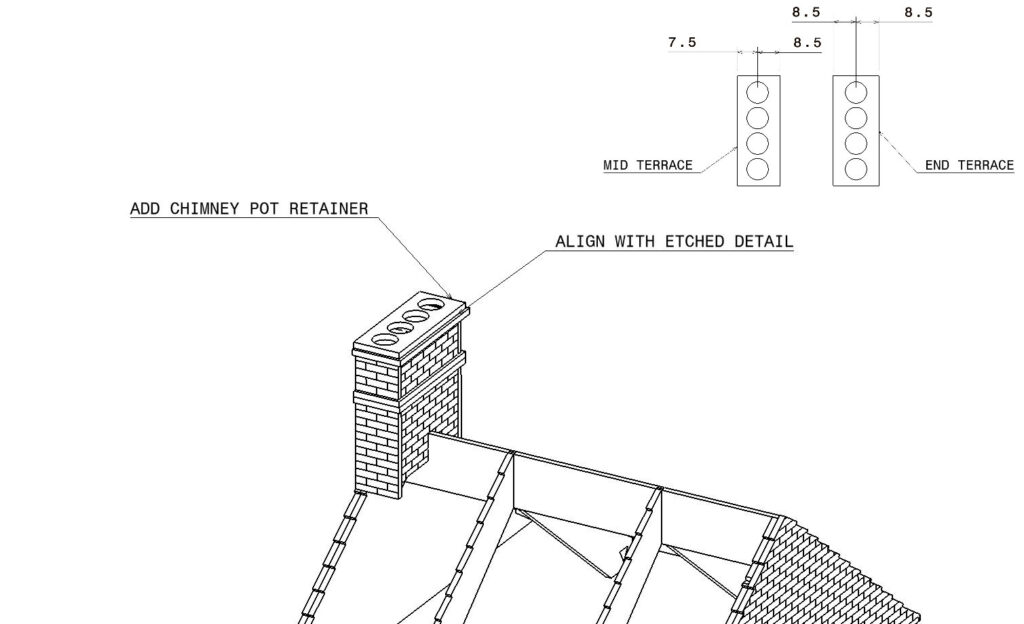
The chimney pot surround goes on next and is aligned with the etched lines on the previous part. There are two in the kit and one is slightly narrower than the other. The narrow one is for the mid terrace the wider for the end terrace. Note the mid terrace option the holes are offset from centre. orientate the parts so the holes are nearest the end of the building. The mid terrace chimney should now be flush to the end wall. The end terrace should now have full protruding decoration around the chimney.
Now is a good time to begin painting the model if you haven’t already begun to do so.
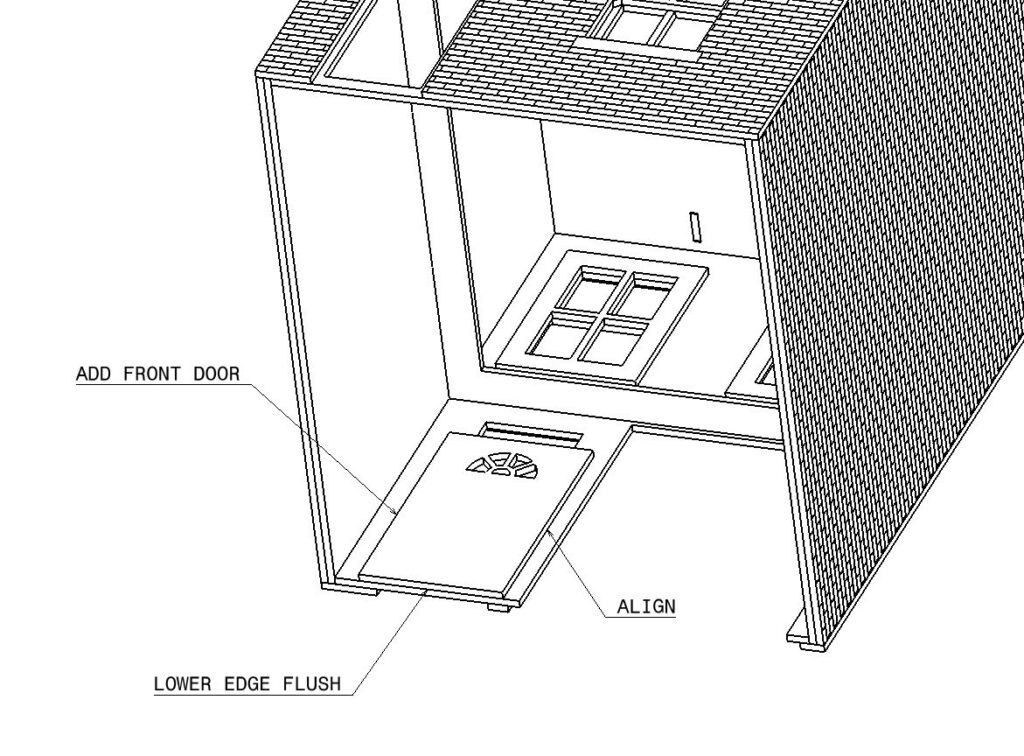
We now need to glue in the front and rear doors. There are a few options in the kit. We suggest which to use for front and rear, but of course thats up to you. Note a rear door doesn’t usually have a letter box, but a small amount of filler or a thick layer of paint could easily hide the etched detail should you wish to change things about . Take care here when gluing in the doors. IT IS EASY TO GLUE THE DOOR IN UPSIDE DOWN! Double check what the door looks like from the outside before applying glue. Apply glue down the vertical edges away from the door detail and attach them from inside of the model. There are etched lines to help you and the lower edge is flush with the base of the house.
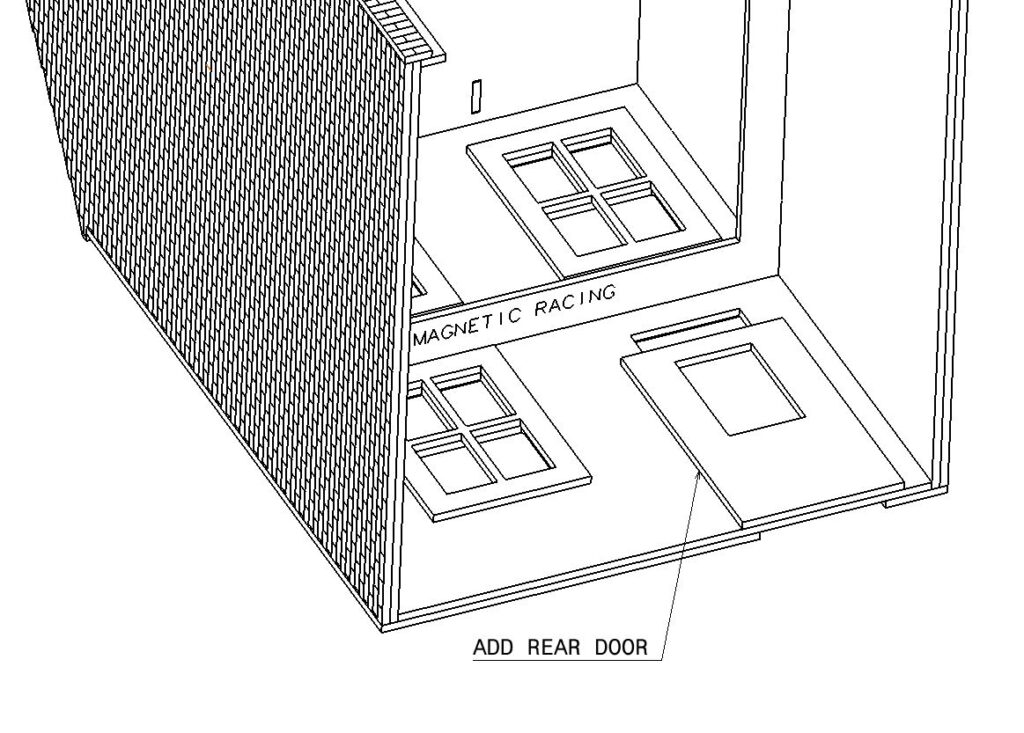
Add the rear door in a similar manner.
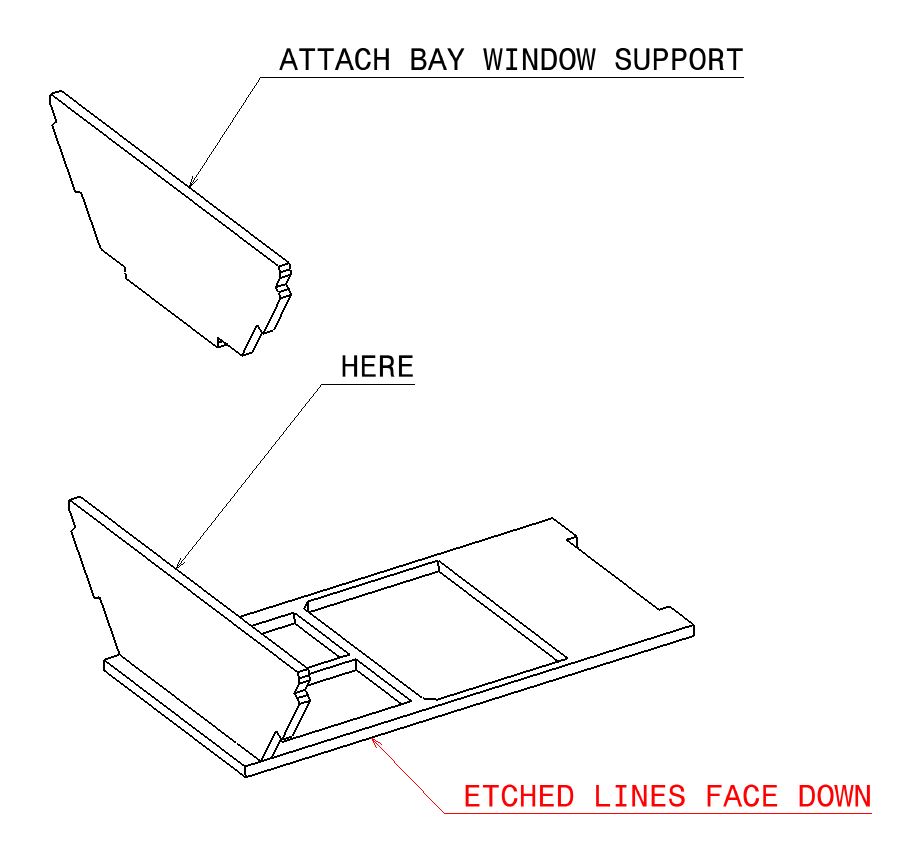
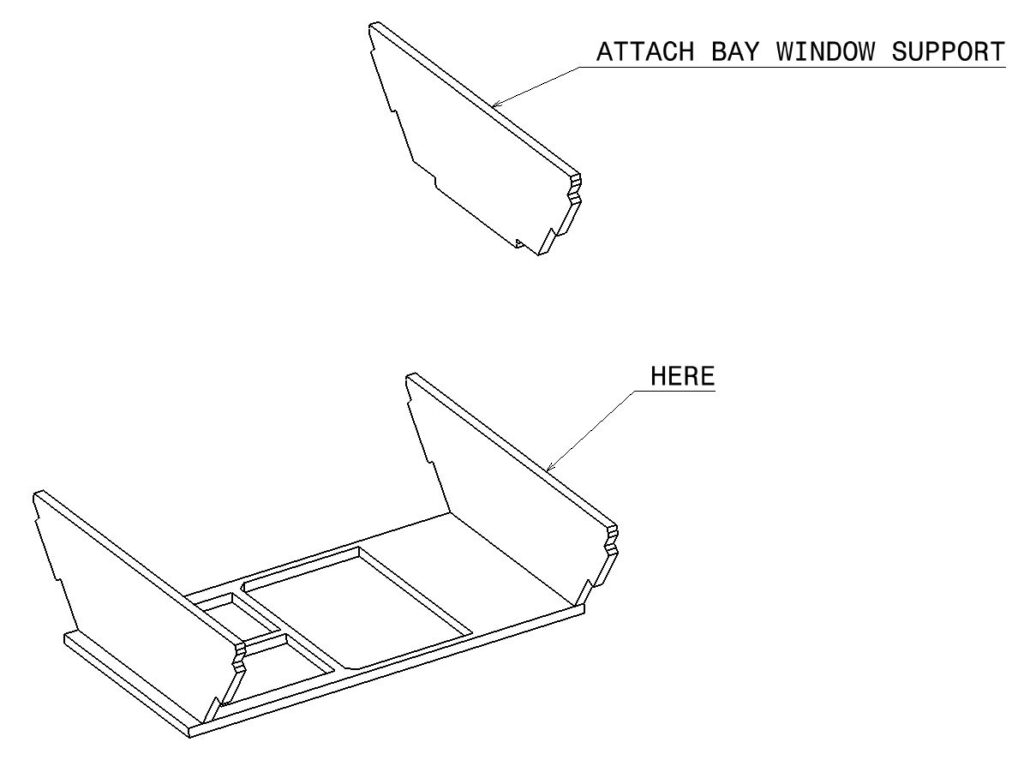
Place the main model aside and begin construction of the bay window as a separate assembly.Take out the front inner wall. This has a notch on the lower end. Note also that there are etched lines around the window and these need to be placed face down on the work surface. There are two identical bay window supports in the kit. Use either. Glue the first into the top notch, once again using another square part in the kit to ensure you glue it upright.
Attach the second bay window support into the lower notch. Again check it is upright.
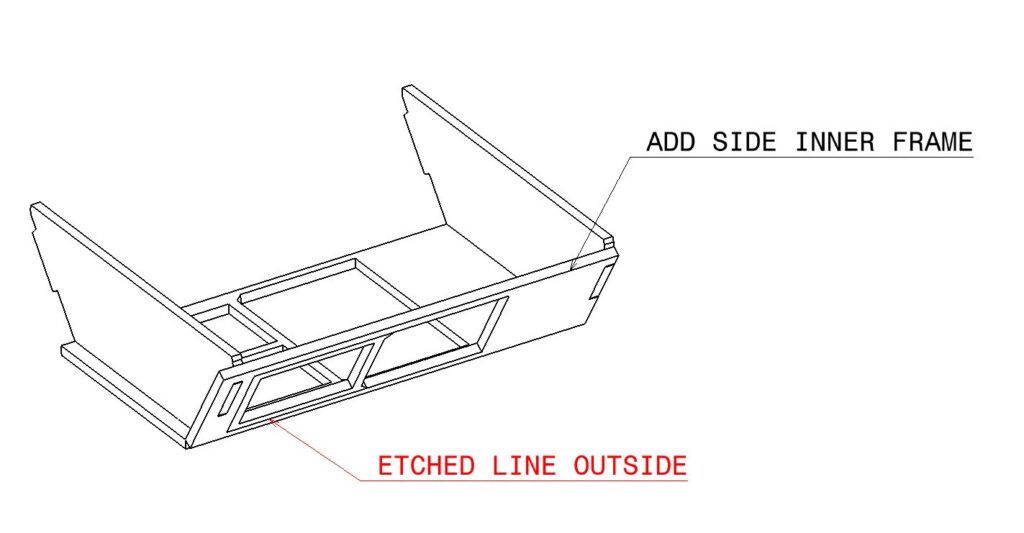
Add the side inner wall. There is a left and right hand one and the etched lines need to face outwards. Turn the model over as it is sometimes easier to locate the parts that way.
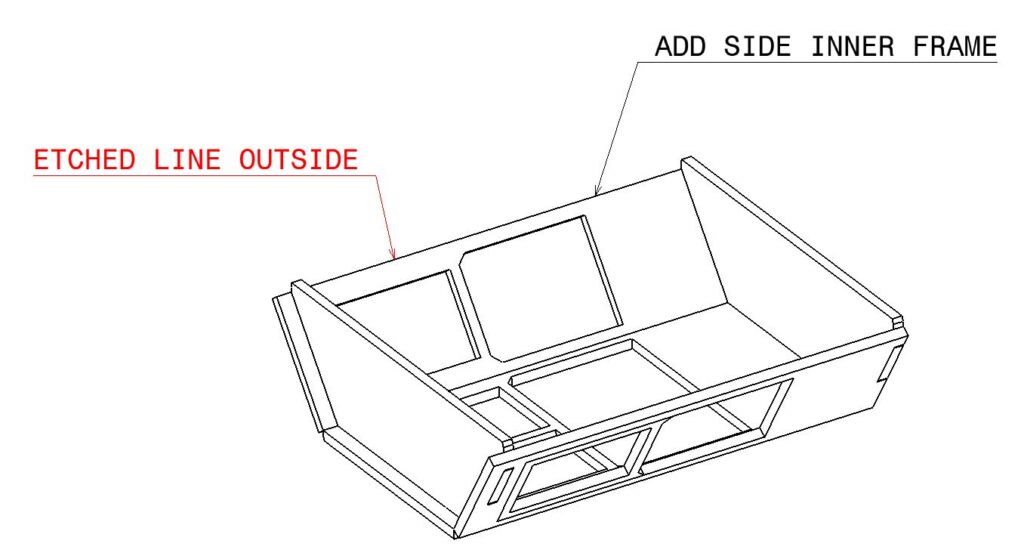
Attach the other side in a similar manner. Once again the etched lines on the part face outwards.
Turn the assembly over if you haven’t already done so and add on the front outer wall. There is decorative etching above the window which goes outside. Look inside the window gap and use the etched lines to align the part. All lines and frame edges should align perfectly. Have a modeling knife handy and some tissue in case any glue is squeezed out into the frame corners. Any excess can be scraped out before the glue dries.

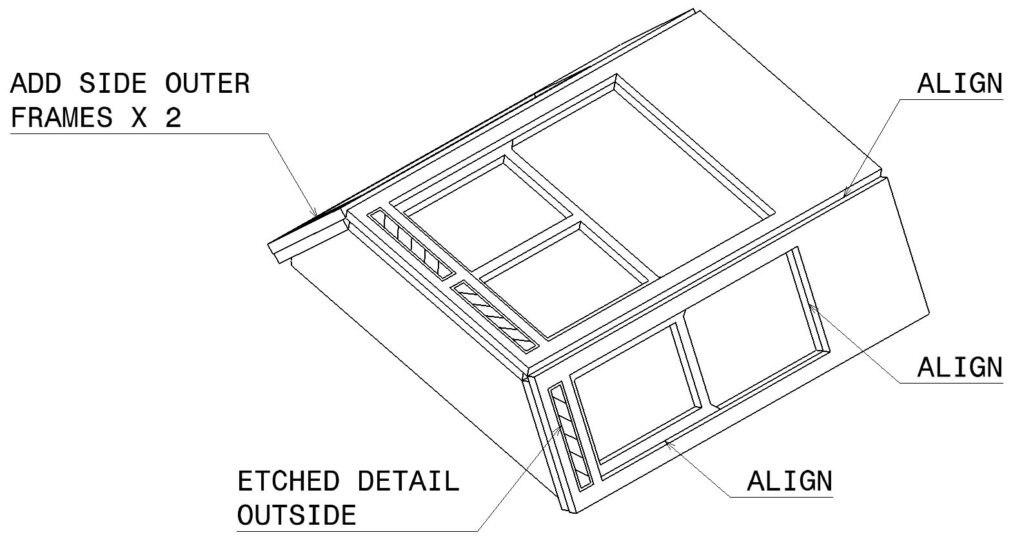
Add the two side outer walls with the decoration facing outwards. Once more align the part using the etched detail and the inner frame. The part should also touch up against the front part we just added. Do not worry if the rear edge is not aligned as this is hidden when we attach it to the main model.
Inside the bay window we need to add in another window frame. There is only one of these in the kit and it has narrow frame edges. Once again use the inner edges to position this exactly. Apply glue sparingly. We can always reinforce it later if we need to after all the parts are assembled.
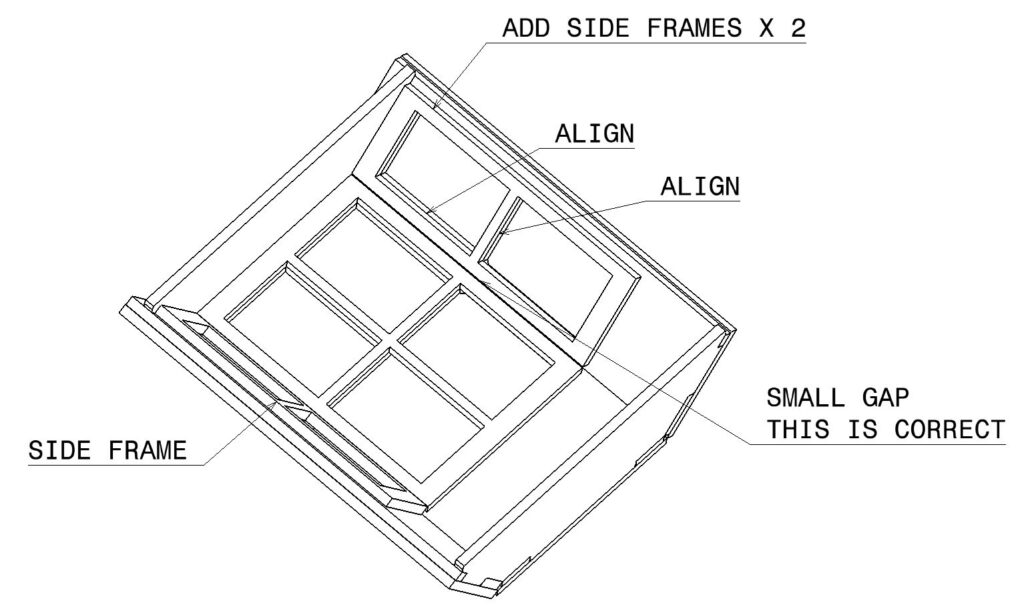
There are two side frames to add. Do this now again checking alignment with the outer frame. Note there is small gap to the front frame. This is correct as it allows a little adjustment to get the inner edges aligned perfectly. Allow the assembly to completely dry before continuing. We do not provide window glass in the kit, but if you want to add some (Acetate / overhead projector film etc.) please do this now.
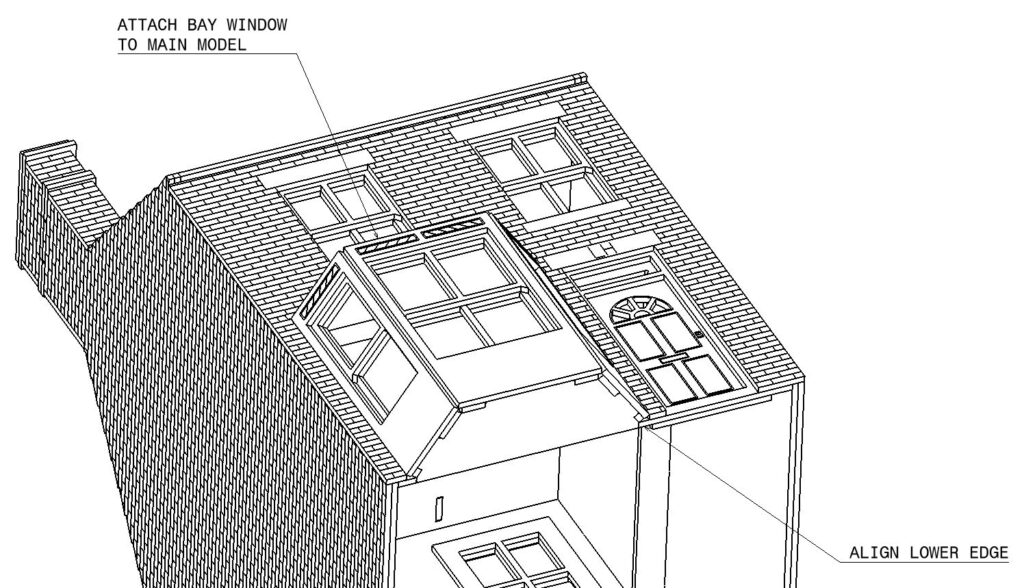
Add the bay window assembly to the main model. Ensure the lower edge is flush with the bottom of the main assembly and it sits neatly in the recess.
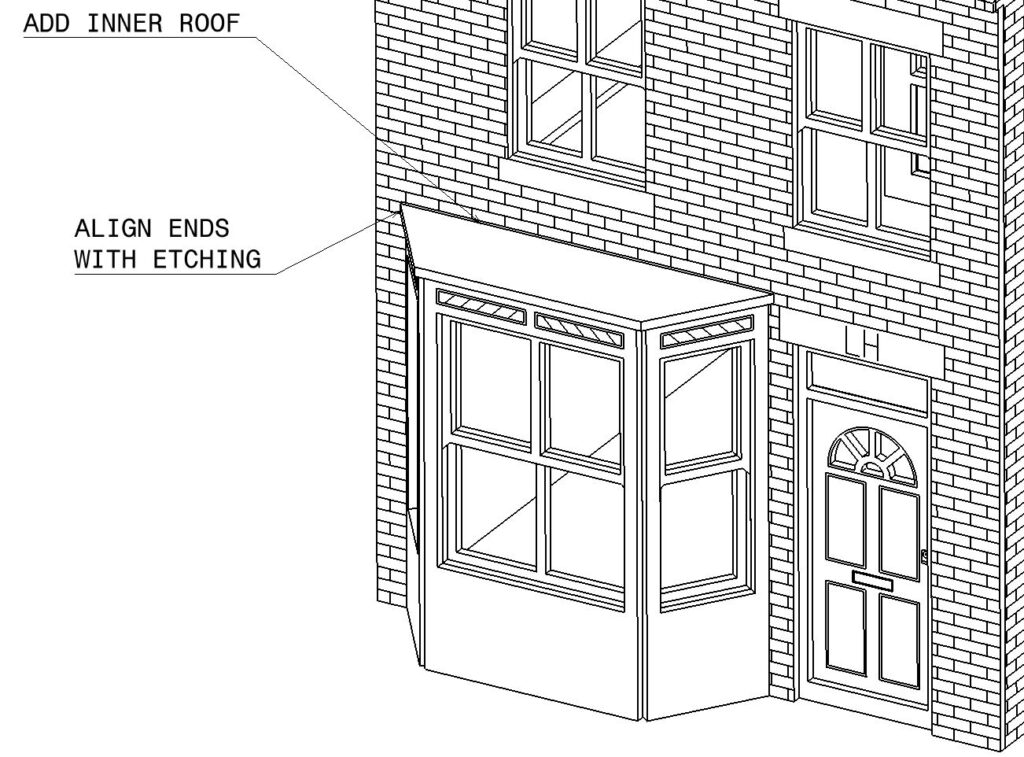
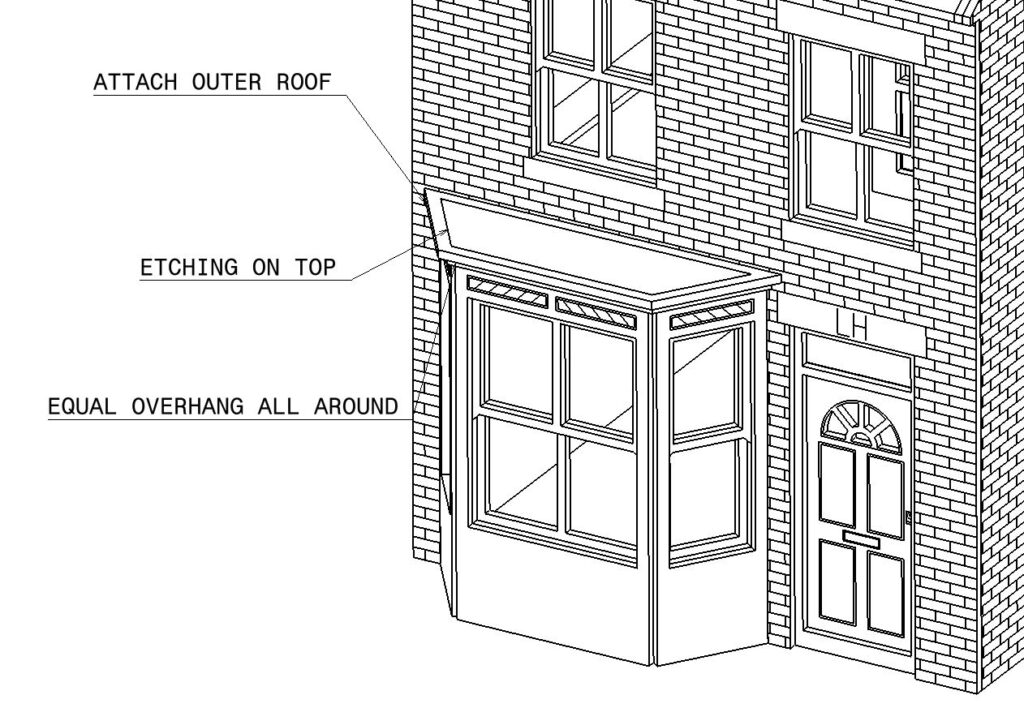
The bay window roof is next. There are two similar parts in the kit. We are looking for the smaller one without any etched detail. There is a thin area on the front wall with no bricks and we can use this to centre the part. You can also check from underneath the model. The overhang should be even all around the window. The part should be pushed back against the front wall.
The outer roof comes next. This has etched detail and this goes on top. There are no guide lines here to enable alignment, but by laying the house model on its back we can view the part from underneath. It is quite easy to glue it so there is an equal overhang all around the previous part.
We now turn our attention to the roof. We have an option here to have a dormer loft conversion or a plain roof. It is also possible to have the dormer roof at the rear (If you want to do this attach the dormer sides at the rear of the building and then follow the Left Hand Terraced house build instructions for the roof assembly only).

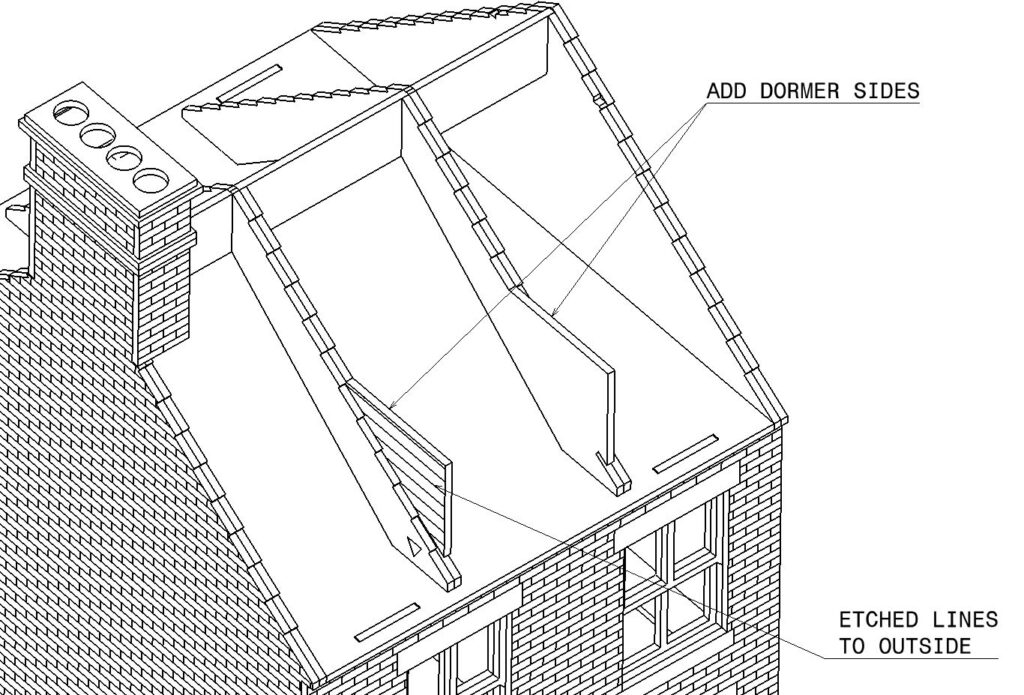
If you want the dormer window. Glue in the dormer sides to the inside of the roof supports. Note there is a left and right hand part and the etched detail needs to face outwards. If you are not having a dormer roof do not attach these. Read the through this part and later there is an image showing you which tile numbers to use.
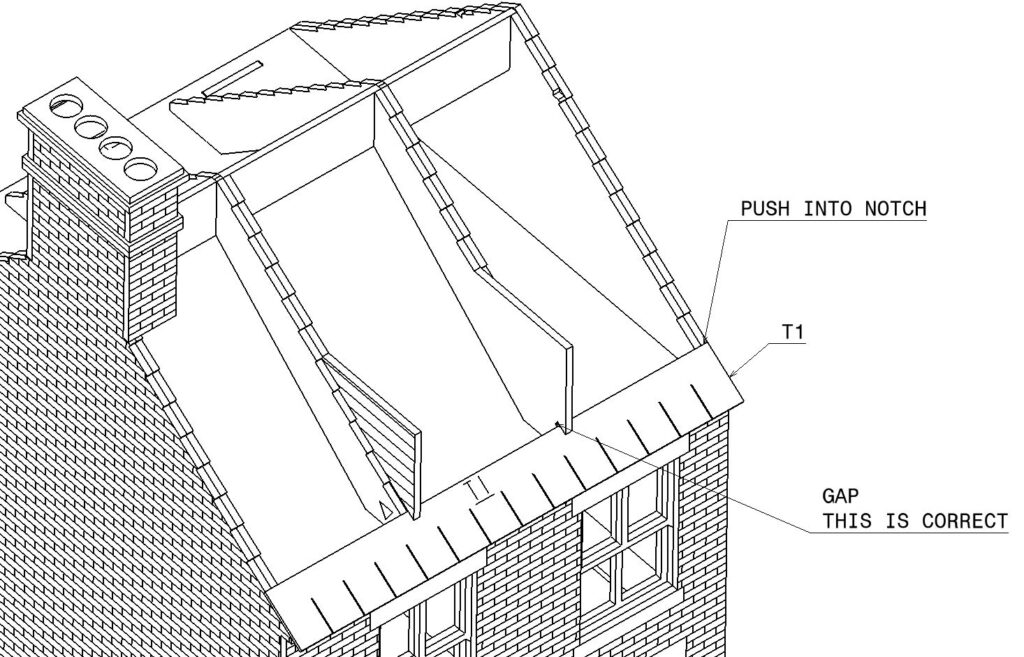
Take out tile T1 and glue it in place below the window. Push up and locate it on the first notch at each end of the building. Ensure the ends of the tiles are level with the end walls. Also note that there is a small gap to the dormer side parts as shown. This is correct. Applying glue in 4 places on the roof beams is sufficient to hold the tiles in place.
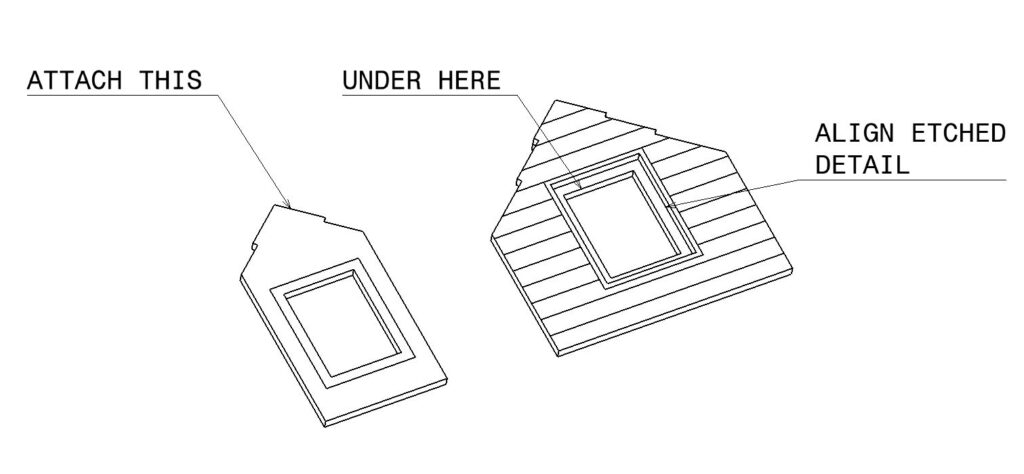
Take out the following two parts and glue the smaller part to the underside of the larger. Use the etched lines to help you align the part. Also check the notches at the top are aligned. If they are a little out, sand the inner part slightly so the notches match. This shouldn’t however be necessary.
Glue these parts to the main model. Note the ends align with the sides of the dormer window and the top corners also align with the top edge.

We are now about to close the roof. If you want to add your own curtains, acetate or interior decoration in the loft space do this now.
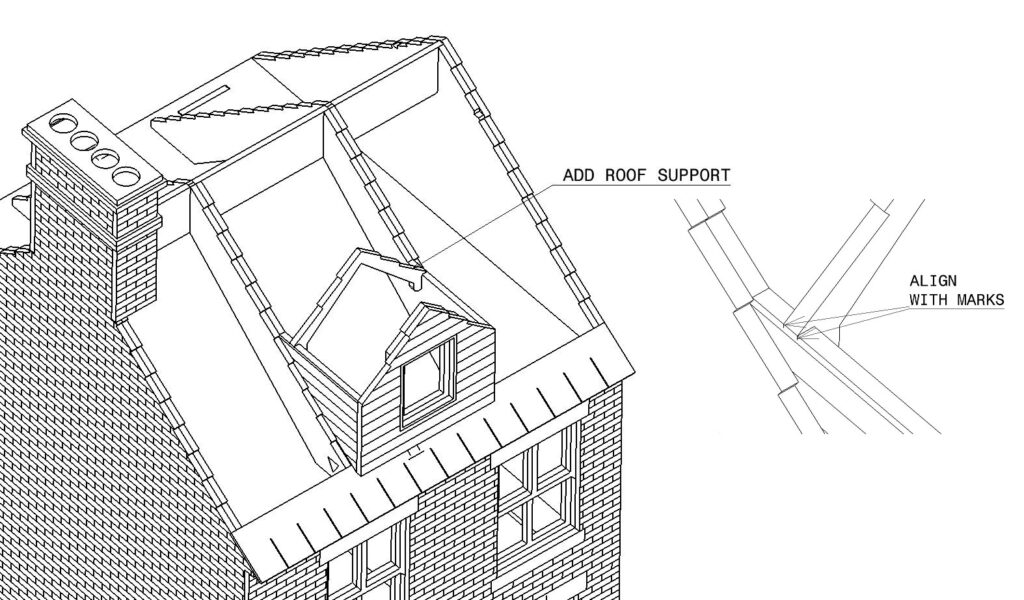
There is a small roof support to add next. We have added very small etched marks on the outer dormer walls to show you where to attach the part. Place the part between the two marks at either end. Any slight misalignment is OK though as this will be hidden by the roof tiles.
Fortunately the safety police are not watching so we will not need 1/32 scale scaffolding or a safety harness to complete the roof!
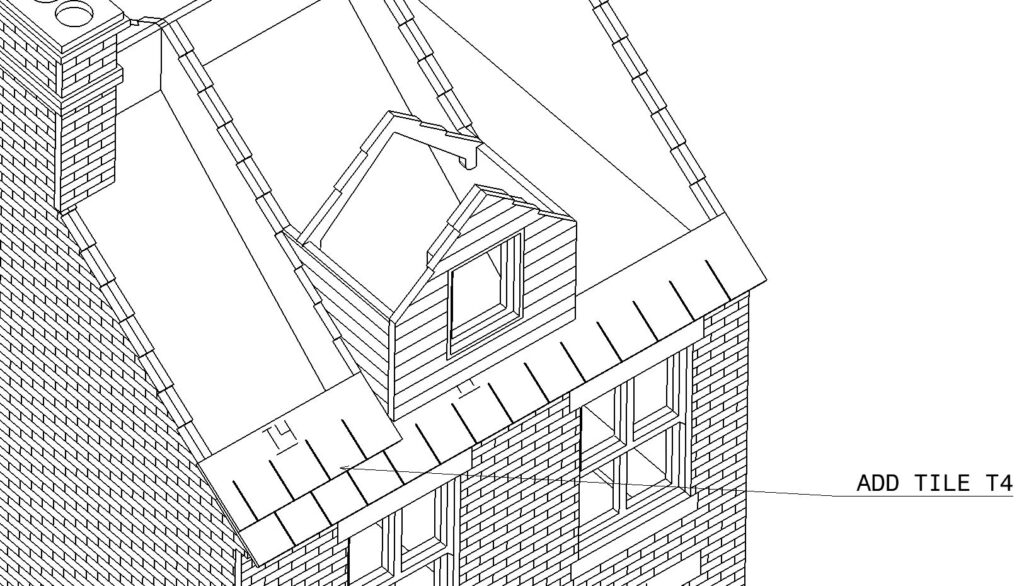
Now add Tile T4 to the side of the window as shown. Once more use the notched edge of the roof support to show you where to locate it.
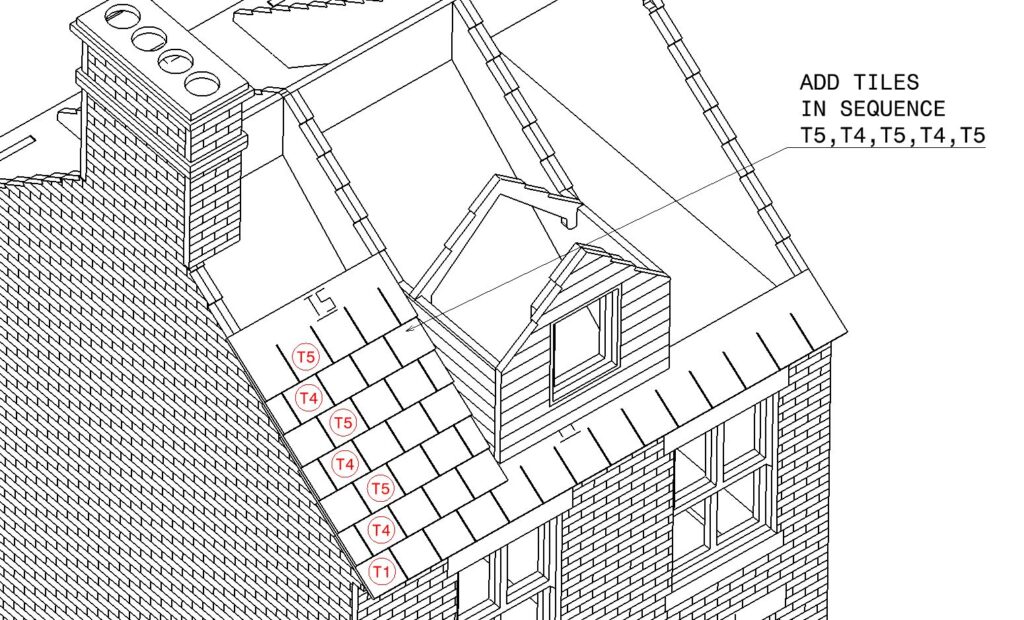
Continue on up the side of the dormer adding tiles T5 and T4 until you get up to the level shown below. Do a quick visual check as you add each tile row that you are staggering the tiles with a half tile at each alternate row.
In a similar manner add tiles to the other side of the window. This time however start with T5. This way you get a correct alternating half tile on each row.
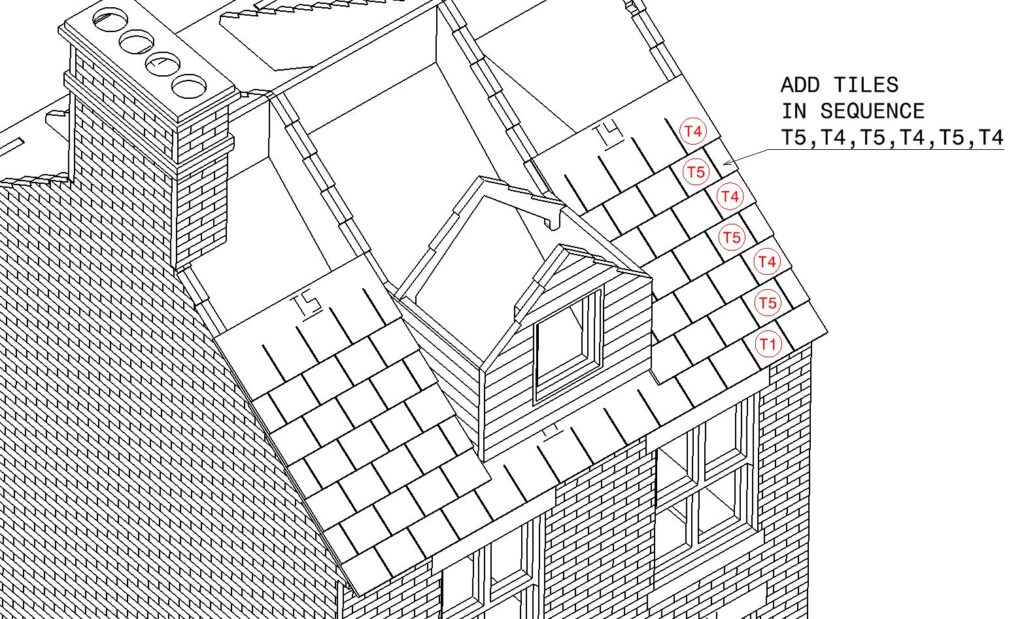
Attach part T6 across the top of the dormer window as shown. Align both ends with the end walls.
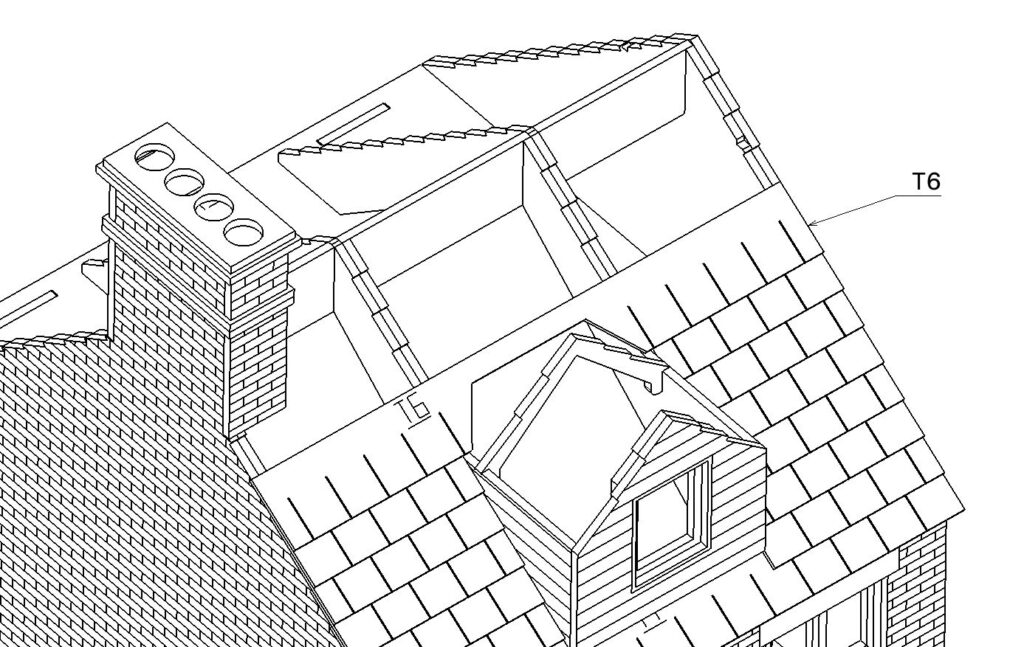
Follow this with T7
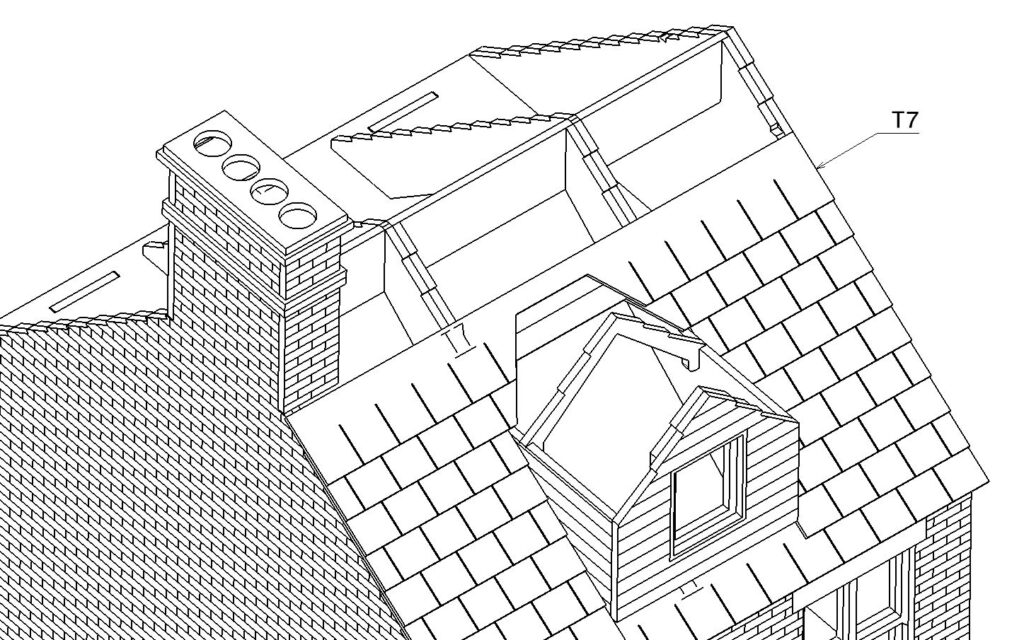
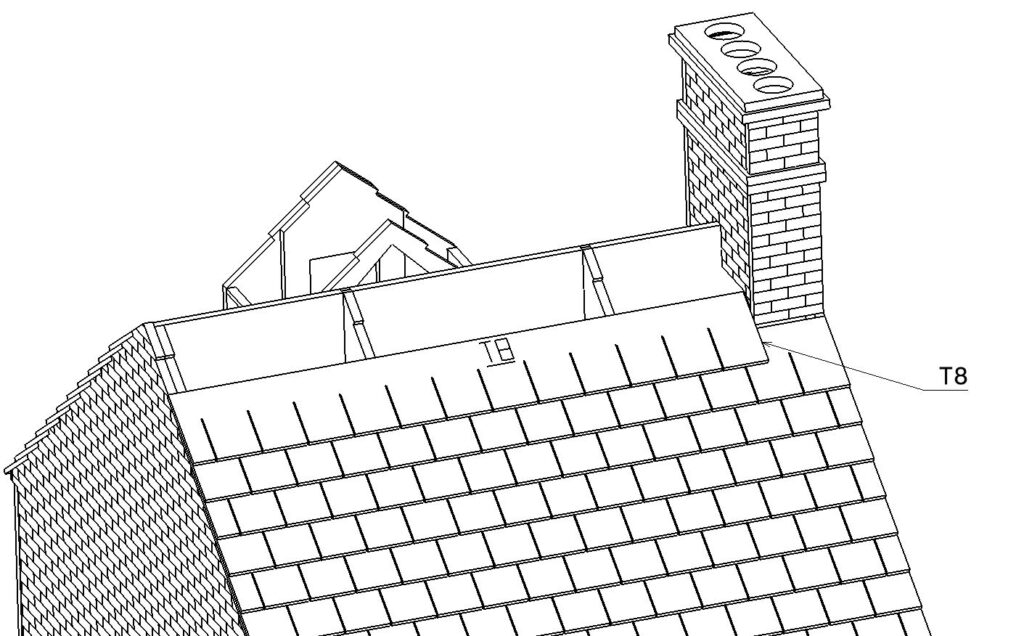
Now use T8. This locates against the chimney, but as a priority align the other end with the end wall. This roof section is a little weak around the chimney. Add a little glue along the top of the previous T7 part to increase the strength. This way you do not need to glue it to the chimney. This is a neater method and there is less chance of glue showing around the chimney.
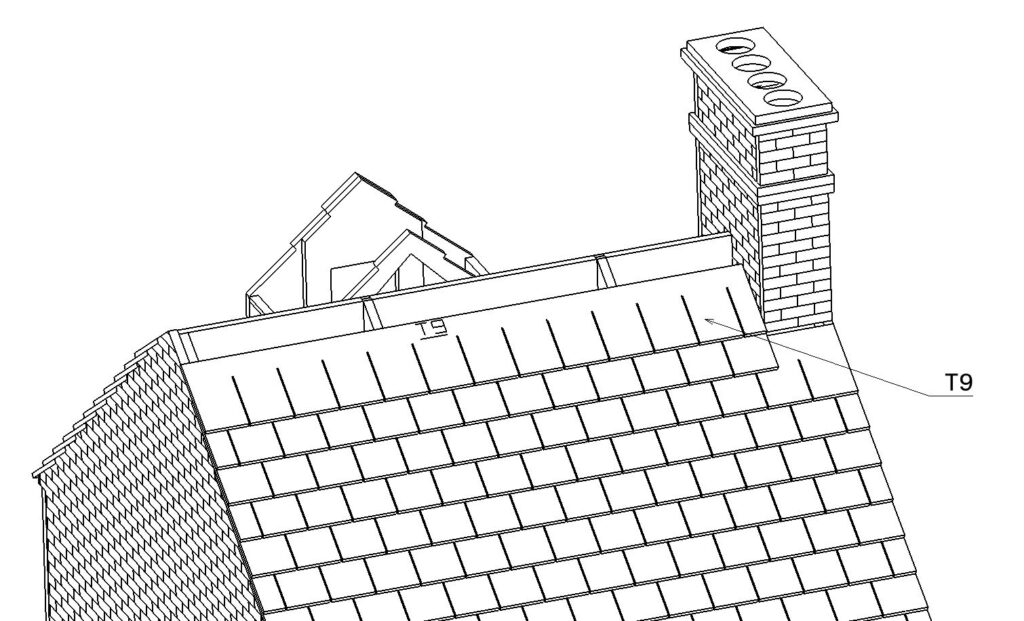
Part T9 goes on next. Once again a little glue along the top of the previous part T8 adds strength.
Don’t add on any more front tiles at this stage.
NON DORMER ROOF ONLY
If you are not having a dormer window, you will need to cover the front roof with the following tile combination.
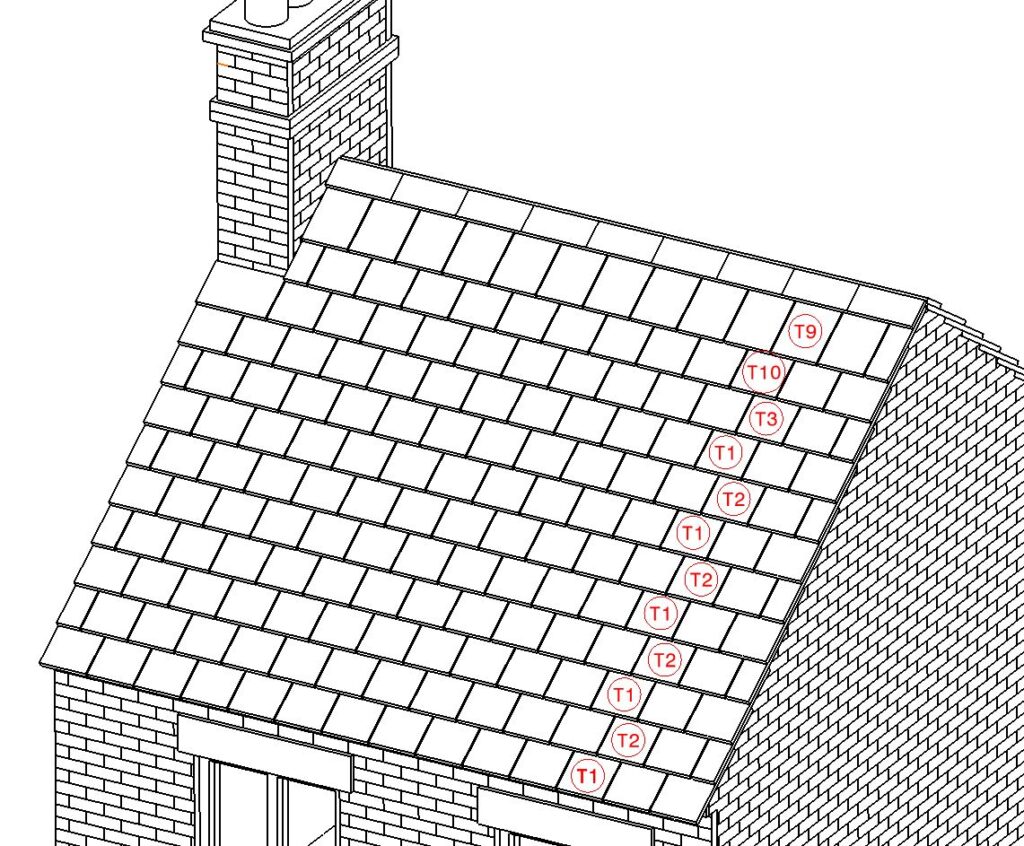
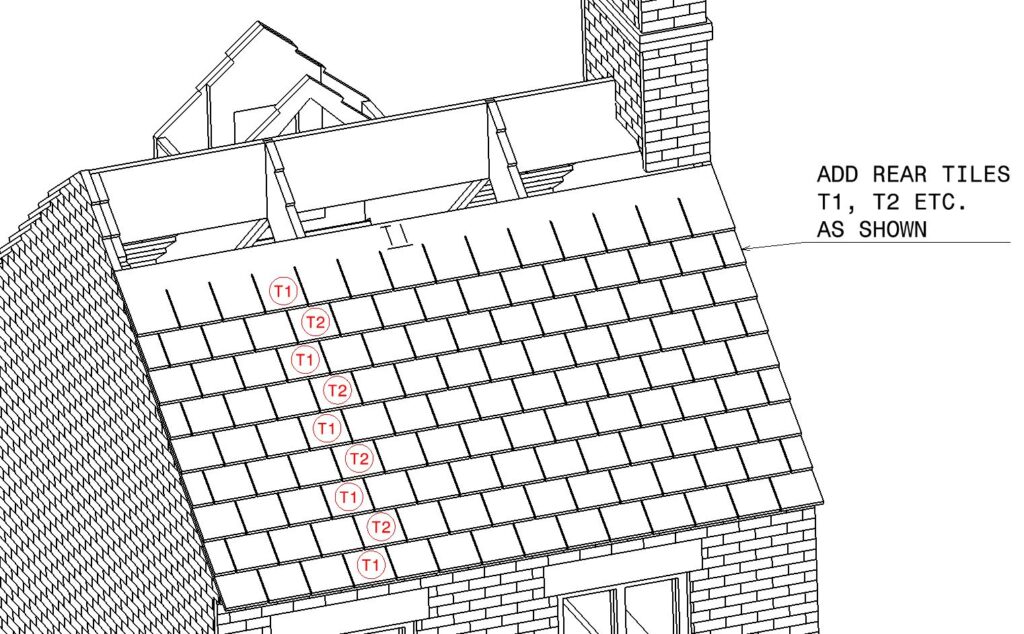
We now turn our attention to the rear roof. Add tiles as before using the following diagram to show you which parts to use.
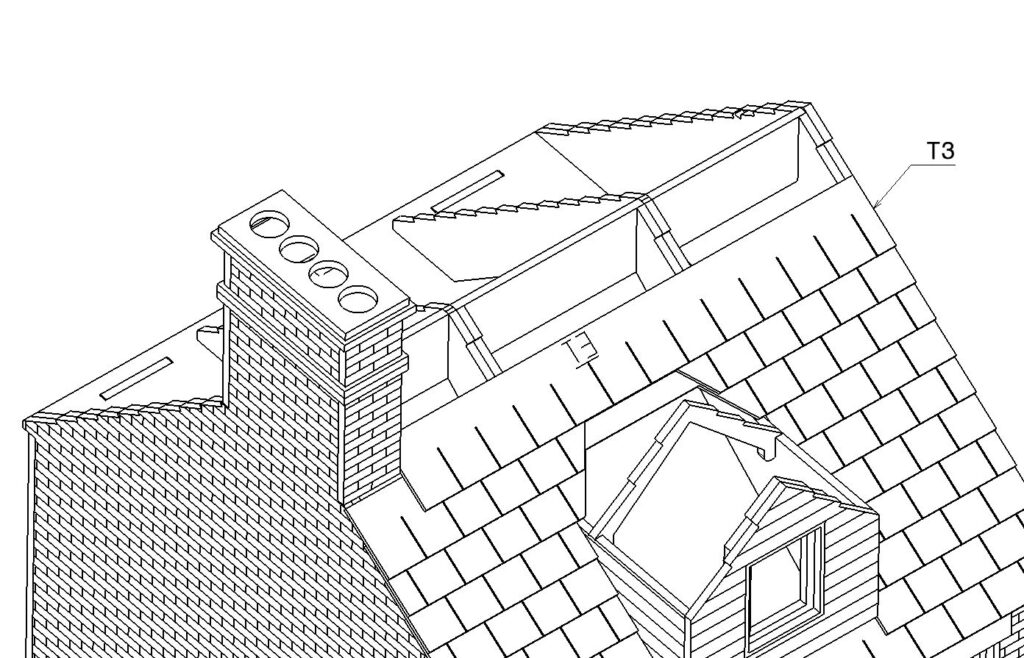
Tile T3 attaches next.
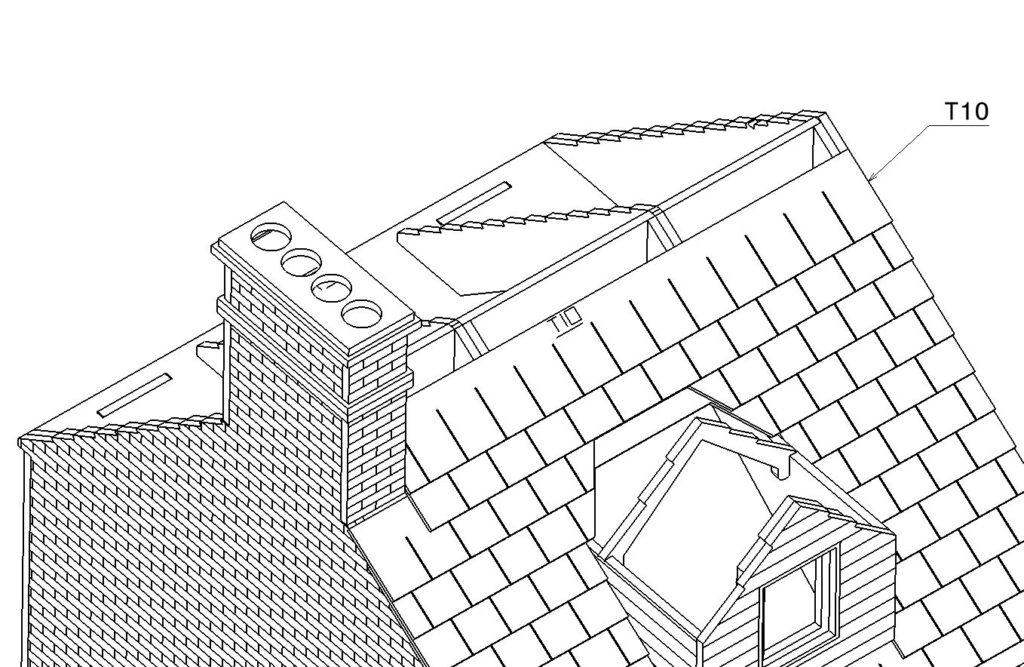
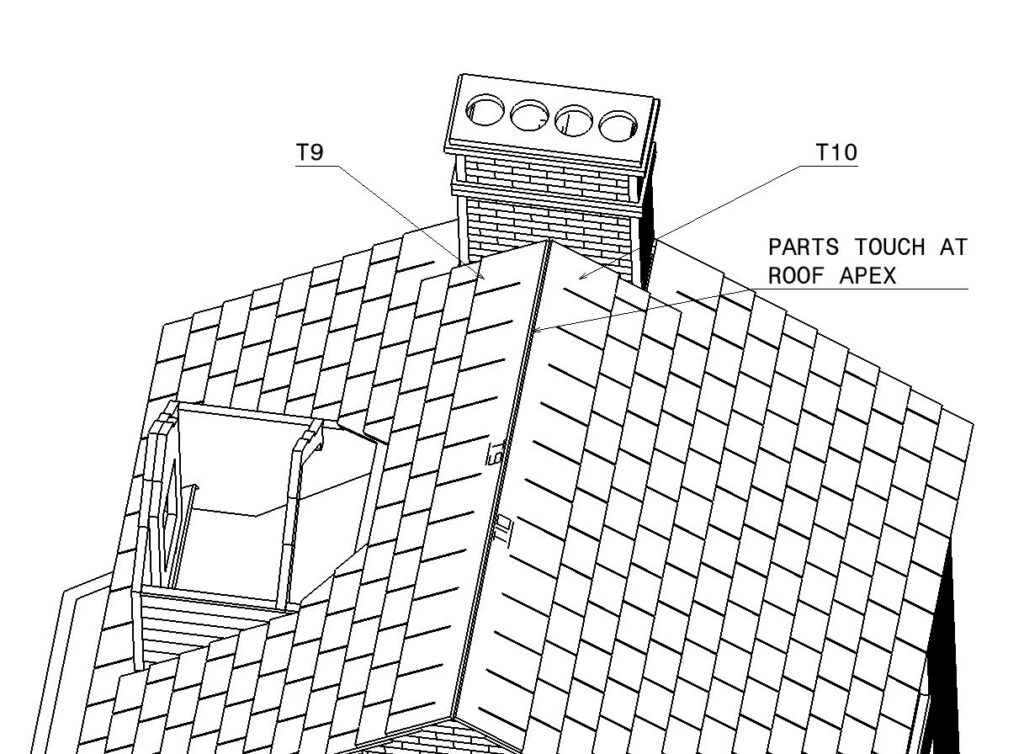
Follow this with T10.
We now add on two parts. Use T10 at the front and T9 at the rear. Ensure that these touch each other and form a neat join at the top of the building.
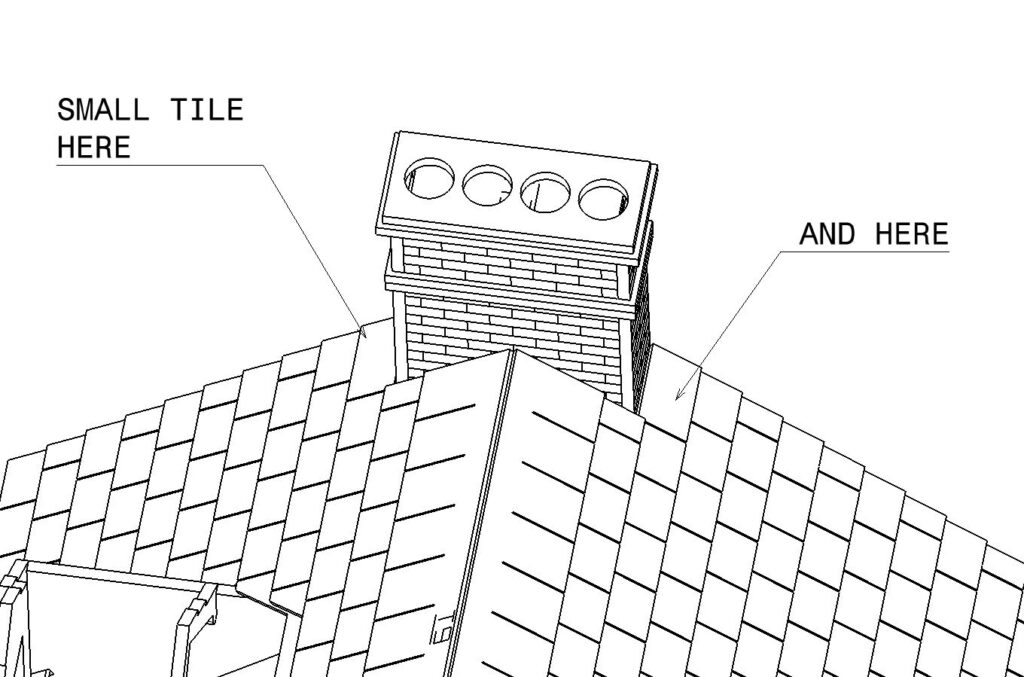
There are two small tiles to add either side of the chimney. We supply a few extra ones of these in case they get lost as they are quite small. You only need two.
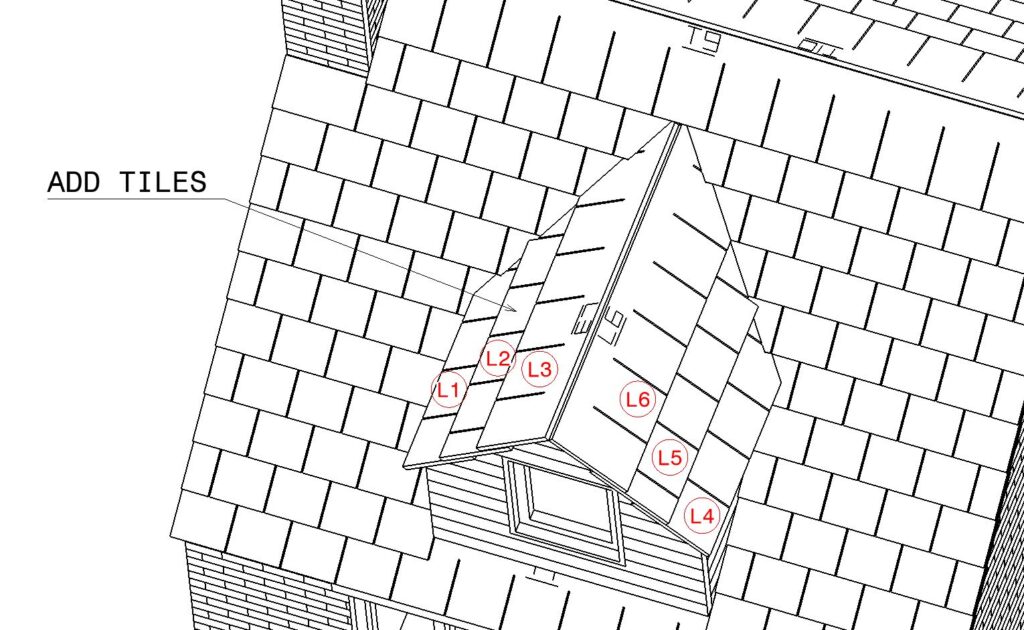
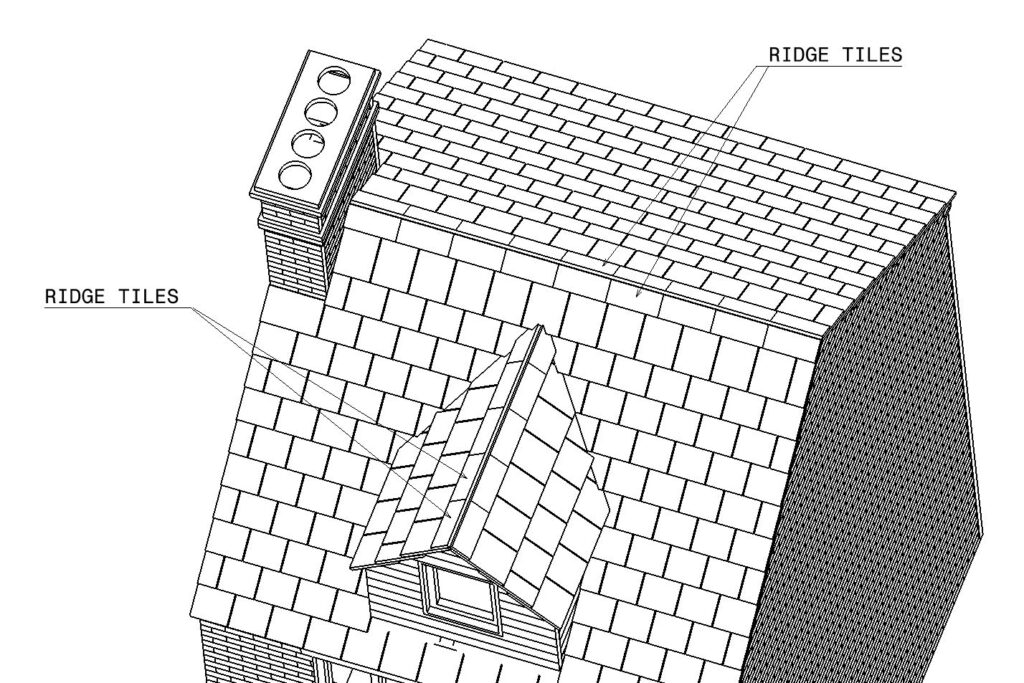
Now attach the first dormer roof tiles. These are labeled L1 and L4. If you have built the main roof accurately the tiles should fit neatly against the other tiles. A little sanding sometimes helps, but take care as the parts are quite fragile.

Continue on adding the parts as shown in the diagram below.
There are some ridge tiles to add now. The etched detail faces outwards. Glue these to form a neat peak at the top of the model. You may consider adding a small amount of model filler here to close the gap between the laser etched parts. This way it forms a more realistic ridge tile.
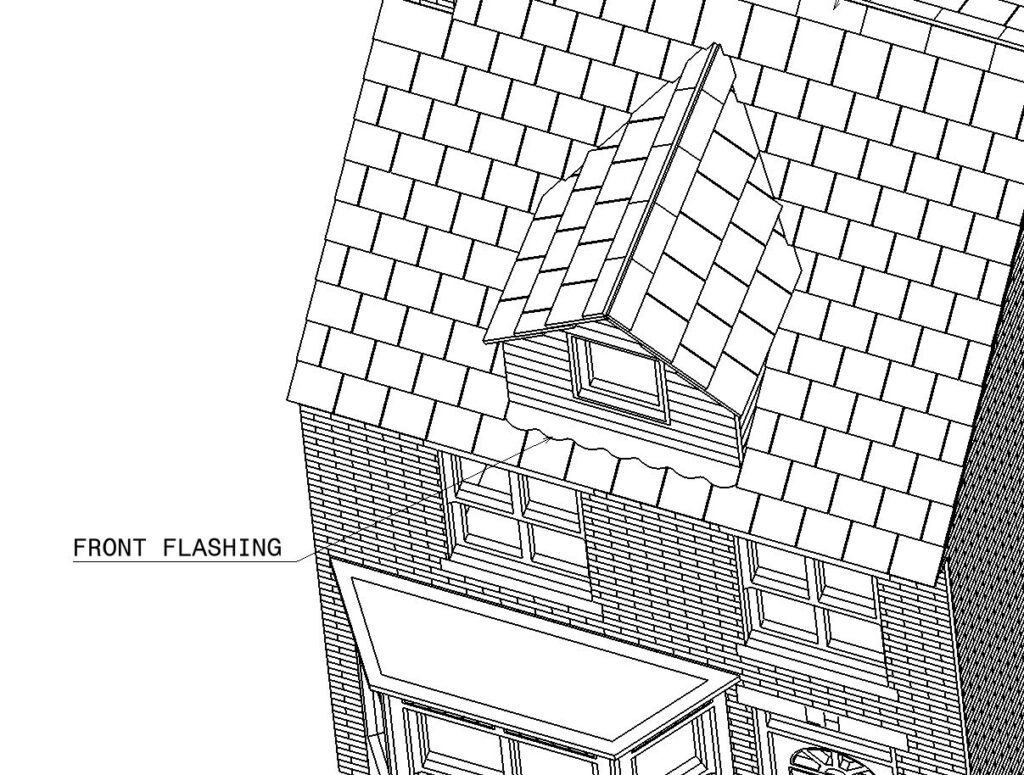
There is now a decorative piece of front flashing to add below the dormer window.
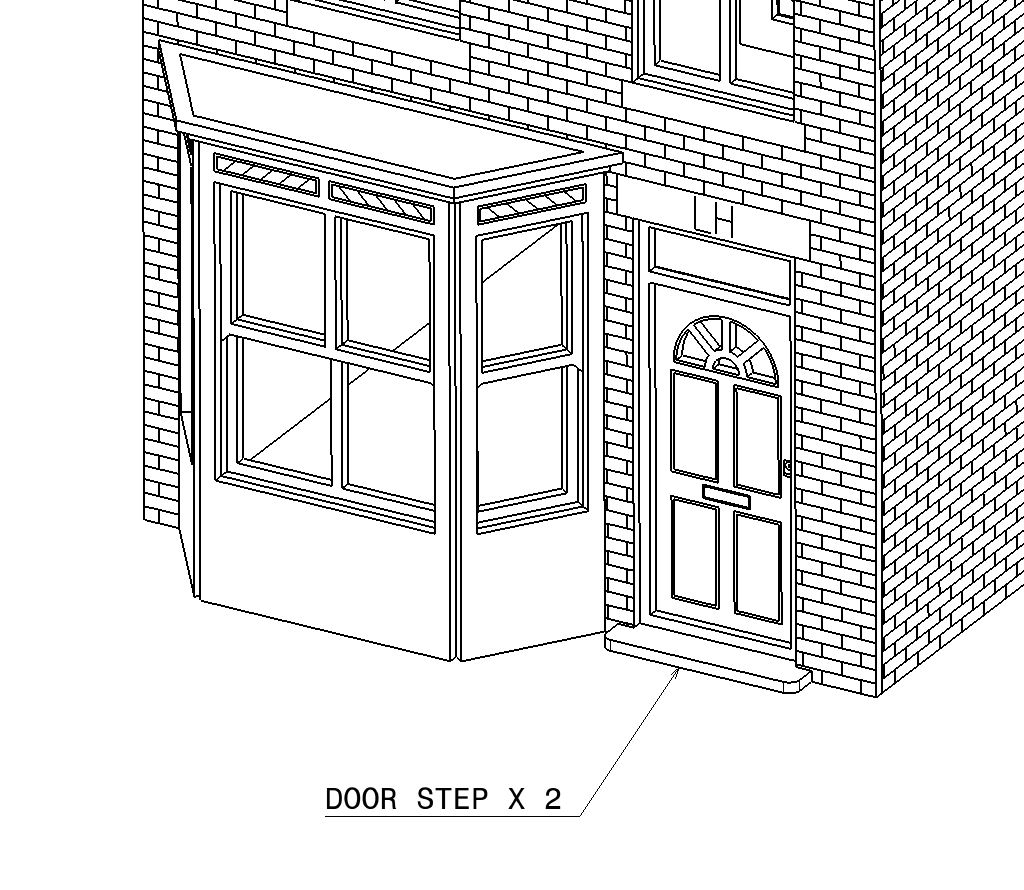
We are nearing the end of the build. Add the two door steps to the front and rear of the model. Place a piece of paper under the model as it is easy to glue these to your work surface as glue tends to seep out of the joint. If you do glue it to the paper, it is easy to peel it off the model and clean up with a modeling knife and sand paper. This is a lot easier than trying to separate the model from your work bench!
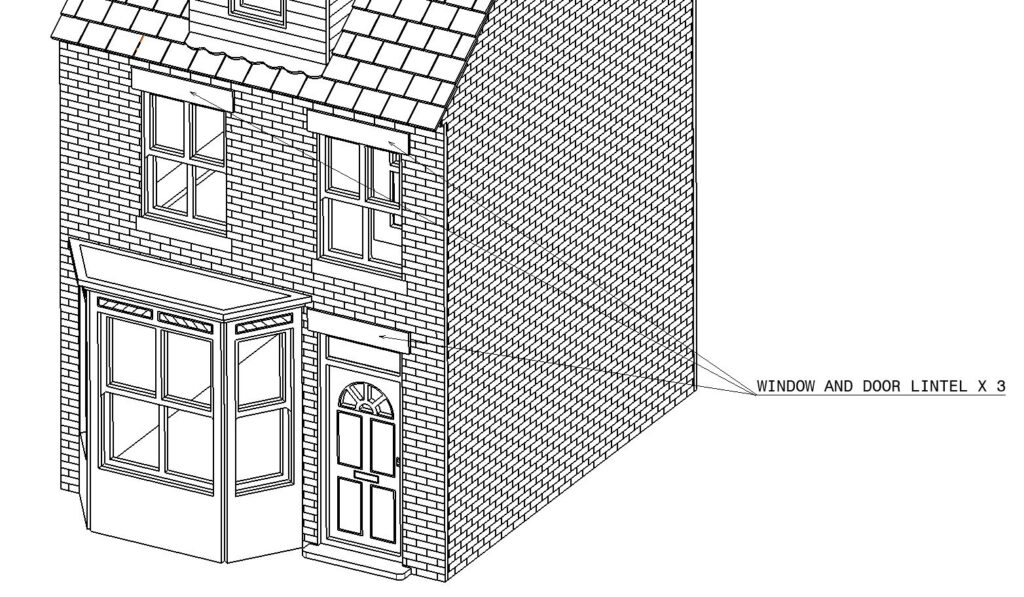
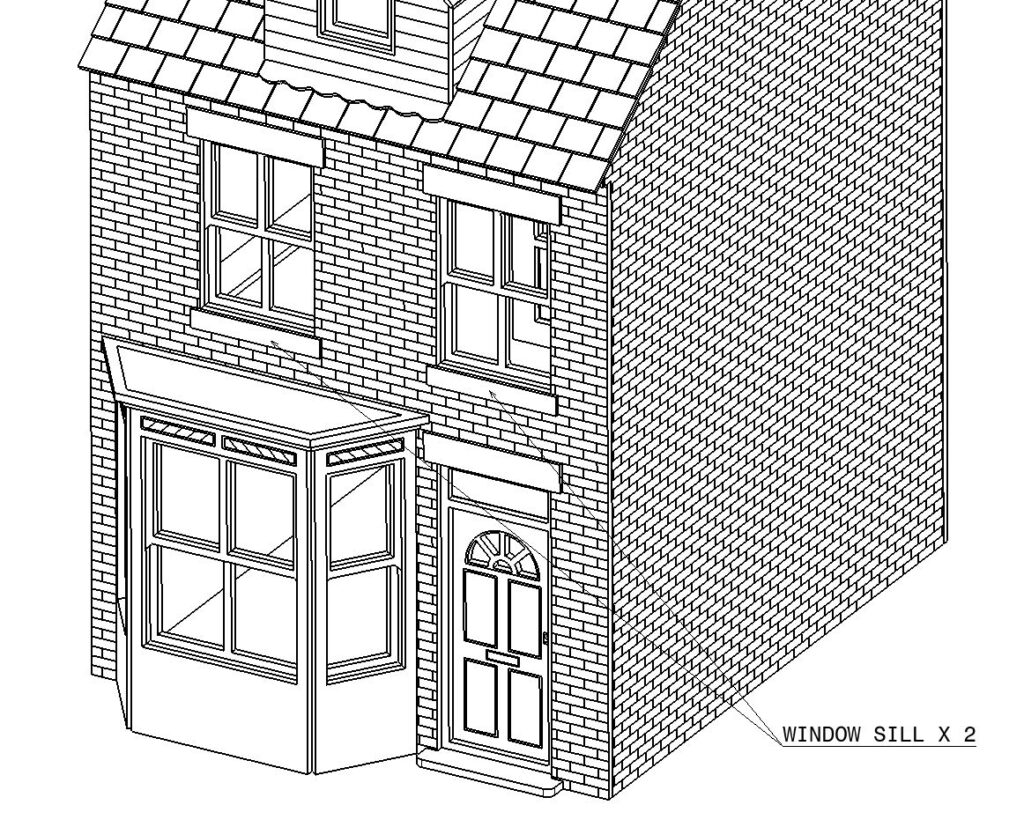
There are three window lintels to add to the front of the house. These are best painted separately before gluing them on. Use the etched lines on the front of the building to help you get them aligned. Do not confuse these with the window sills. The window sills are a slightly narrower part. We provide a few extras in the kit should some go missing.
Add on two smaller window sills in a similar manner.
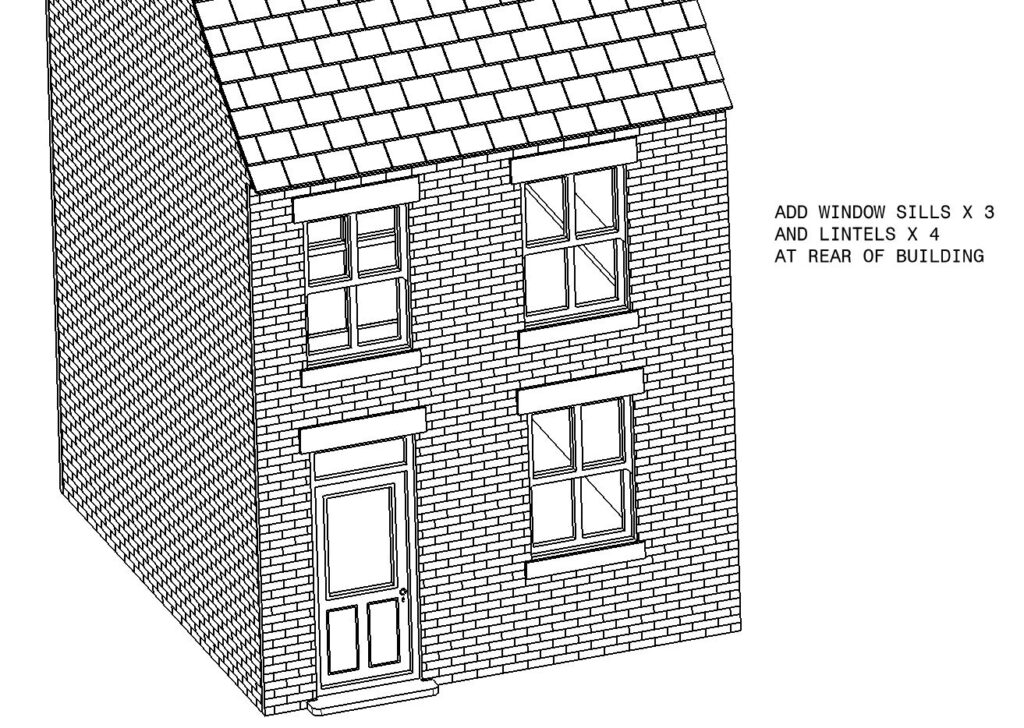
At the rear of the model there are 3 window sills and 4 lintels to add.
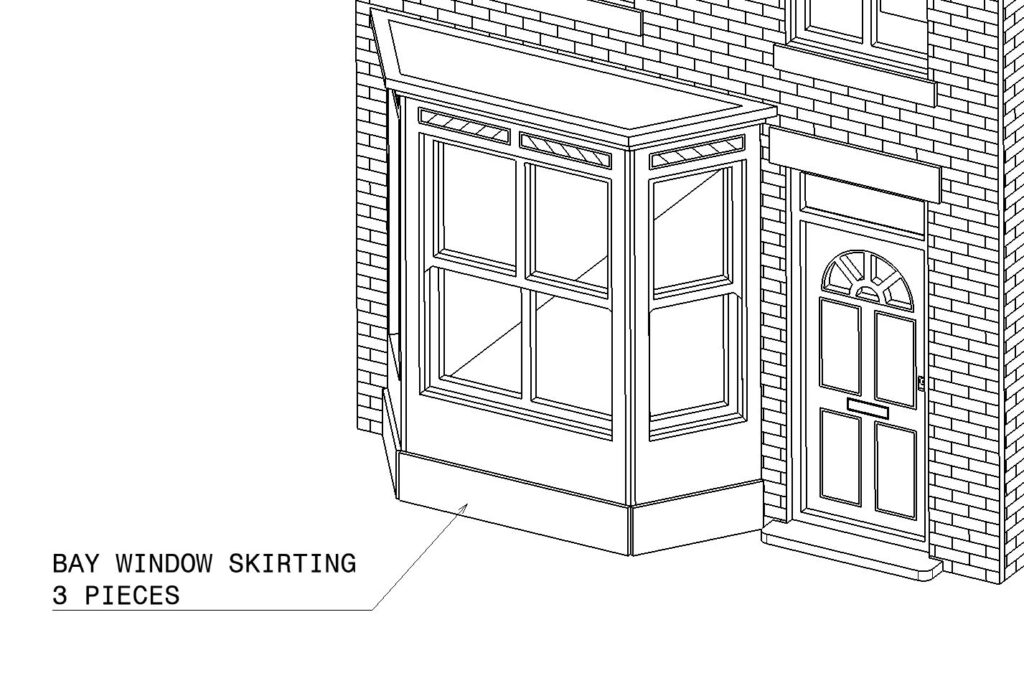
There are some larger pieces of skirting to add at the front of the bay window. Once again a little model putty down the vertical corners can improve the looks of the bay window.
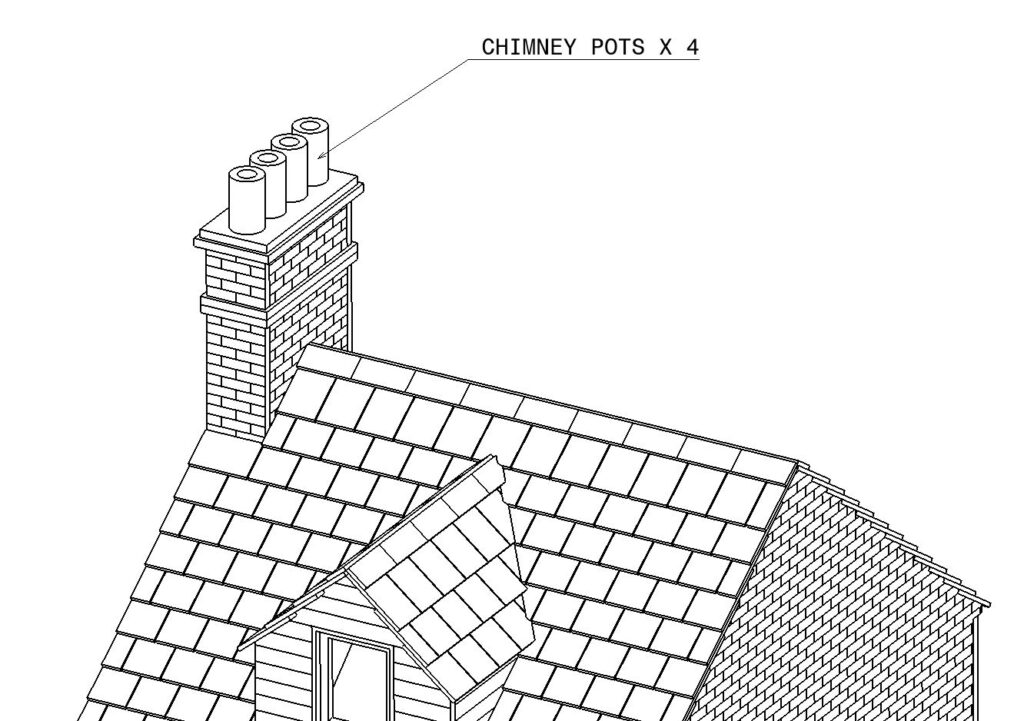
The last job before we lock the door and light the fire is the chimney pots!
Before adding the chimney pots, double check the round recess in the top part. Clean out any glue otherwise the pots may not glue in square. When happy apply fresh glue and press the plastic pots home.
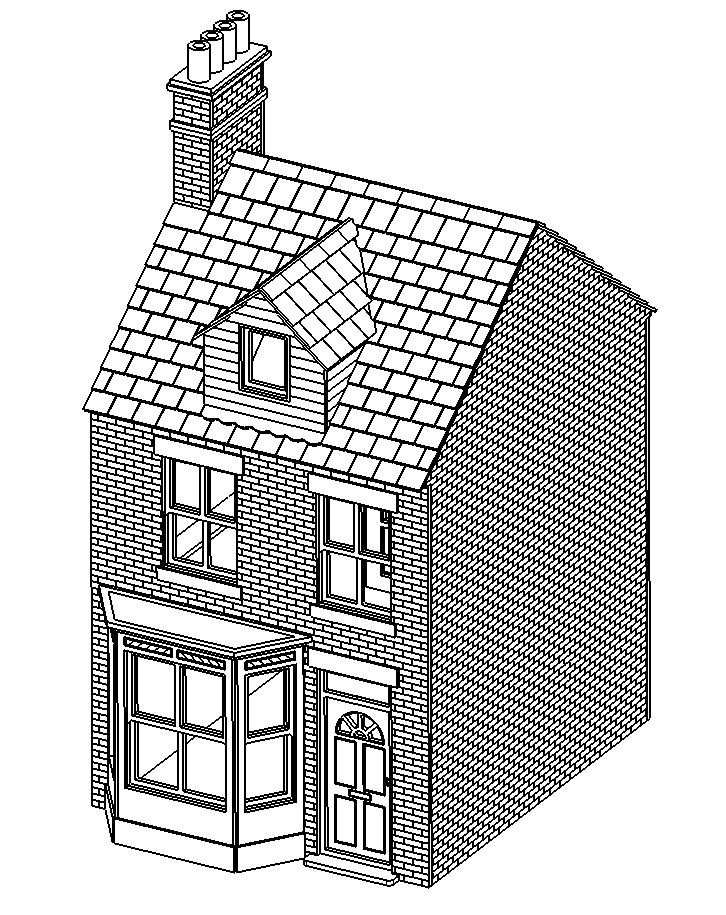
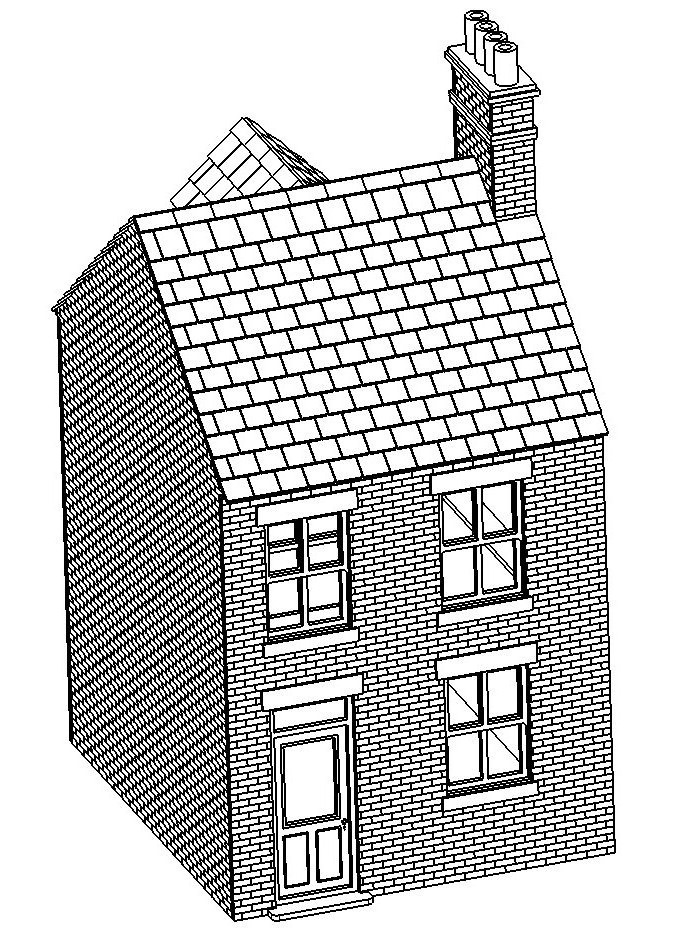
That completes the build, we hope you enjoyed the process. The terraced house does look great on its own, but its natural home is up against another or in a row.
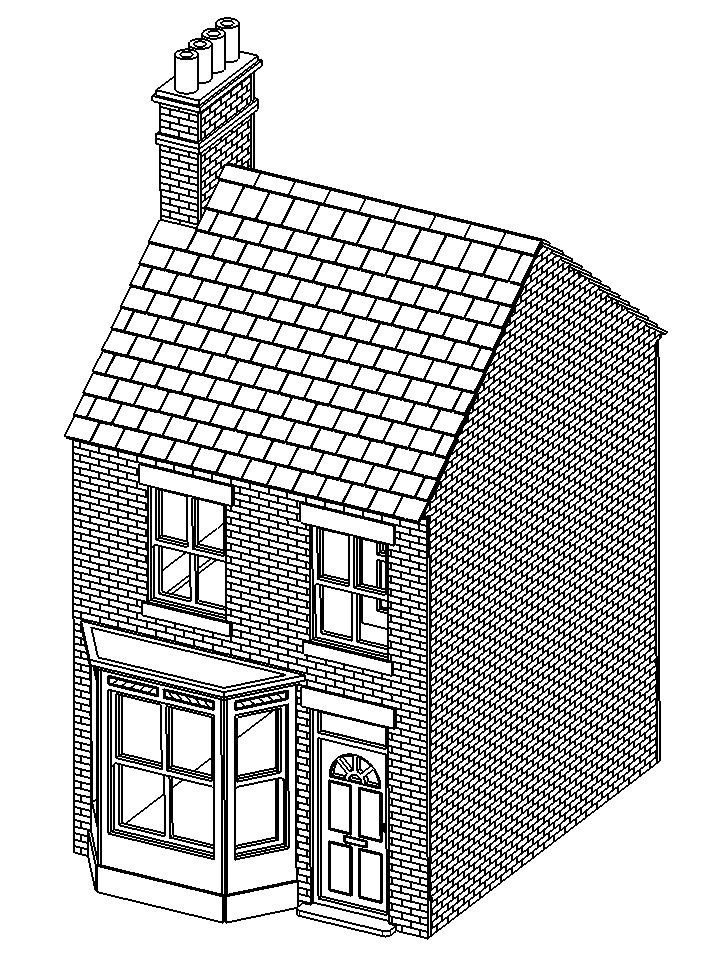
Below are some images of the finished model with both a dormer window and without. We would love to see images of your finished models, so feel free to email them to us at sales@magneticracing.com
